

Hello and thank you for joining us for our very first Nestabling™ week! Designers from both Scrap-Mart.com and Want2Scrap™ have teamed up to bring you a week long mini blog hop full of beautiful projects featuring Nestabling™ by Want2Scrap™. If you are just joining us, hop on over to the Scrap-Mart Blog and start there. Before we get started with the projects, we’d like to send a special thanks to Want2Scrap™ for their generous donation of Nestabling™ for our designers to work with.
Please check out the fantastic project by Eva posted on the Scrap-Mart Blog and Elise's blog from Want2Scrap™ today.
Thanks so much for stopping by today and I hope you enjoy the blog hop!!
Hugs,
 Now check out this amazing album by Dana!
Hey friends! I'm excited to share a sweet altered chipboard album with you today.

So much amazing detail...


For a cascading page album, it's all about the edges that hang out for me. I kept my embellishments to the edges that would show and left the rest of the book page fairly open with minimal elements added outside of designer papers.

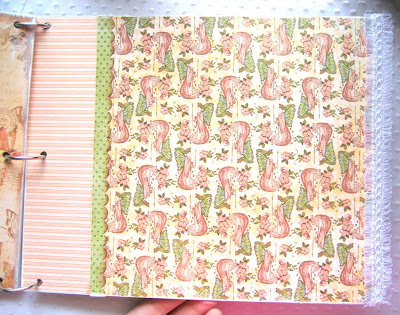
Using a paper pad like this one from Graphic 45 helped ensure a cohesive look throughout the whole album. I also decided to use white pearl and silver bling embellishments from Want2Scrap™ throughout the album, again to give that cohesive look I was going for.


Want2Scrap™ Supplies:
Please check out the fantastic project by Eva posted on the Scrap-Mart Blog and Elise's blog from Want2Scrap™ today.
Thanks so much for stopping by today and I hope you enjoy the blog hop!!
Hugs,
 Now check out this amazing album by Dana!
Hey friends! I'm excited to share a sweet altered chipboard album with you today.

So much amazing detail...

I used the Retro chipboard album from Want2Scrap™. This style of album also comes in acrylic to maximize your creative opportunities.

One of the most interesting features of this particular album for me was the fact that the pages cascaded and also had some cutout designs that I could use to highlight little bits like the sweet fairy and chick above.

For a cascading page album, it's all about the edges that hang out for me. I kept my embellishments to the edges that would show and left the rest of the book page fairly open with minimal elements added outside of designer papers.

Using a paper pad like this one from Graphic 45 helped ensure a cohesive look throughout the whole album. I also decided to use white pearl and silver bling embellishments from Want2Scrap™ throughout the album, again to give that cohesive look I was going for.

Aren't these sheer flowers from Want2Scrap™ just delicious? They come blinged up with the same high quality bling that is used in the bling swirls and individual pieces.

Adding additional chipboard pieces either cut using your die cutting system or the beautifully ornate chipboard shapes from Want2Scrap™ is a snap with a strong liquid craft glue.

This flourish was painted, stamped, glittered and misted (whew!) before I added just a bit of silver bling to create an interesting corner on one of the book's pages.

Simple additions of interesting trims to book edges are a fun way to embellish those back pages that are patiently waiting their turn for some pretties. This piece of ribbon came in a mixed pack from Want2Scrap™ (more coming soon!)

The final pieces to this mini album puzzle are a pretty back cover and

flowing iridescent ribbons to hang from the top snap ring binder. Now if you have never or rarely tackle a mini book project you might want a few tips for the journey. The following may be helpful to you and then you'll be cranking out minis like there is no tomorrow!

To start with, I made the happy discovery that the Retro album had the perfect height dimension for my 8x8 paper pad! That means less cutting and I like that!
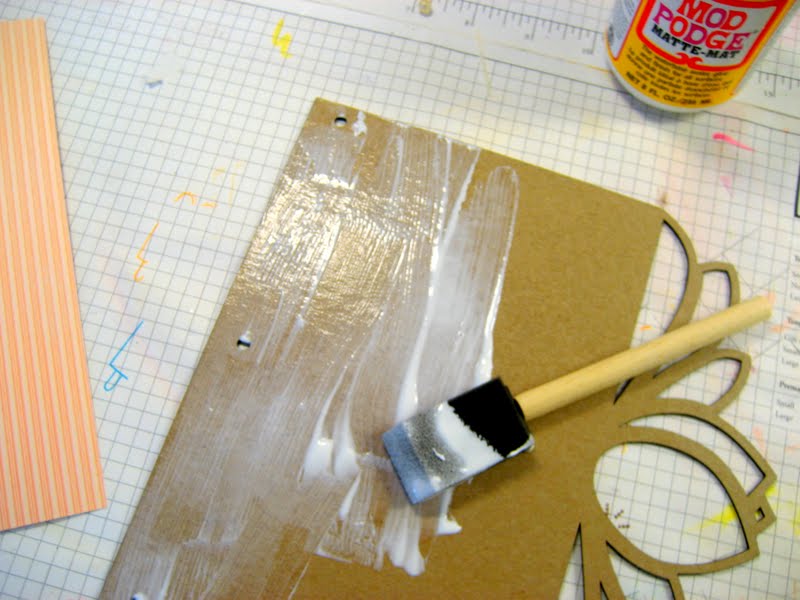
Making your designer papers one with the chipboard is an easy task. I am a fan of Mod Podge glue for this. I spread an even layer of glue with a foam brush over the whole surface of the chipboard page base. Don't forget the ornate parts. The designer paper is simply laid down upon the glue and left to dry after smoothing down any air bubbles. A rubber brayer helps with this task.

Once the glue dries (NOT when it's wet like I did above!) use a sharp craft knife to cut away papers from the edge detailing.

On the very back pages of the retro album, the 8x8 paper runs a little bit short. No worries! This is an opportunity to break out some paper punches to make a scalloped edge in a contrasting paper to cover the remaining chipboard.

Finishing off those edges, especially the detailed ones, may call for the use of a file to rub away any rough edges. I also chose to run an edge of white acrylic paint along my album edges as you can see above.

Once all of the pages have been covered in paper, sanded and painted let then REALLY dry in a stack with a meaty book to way them down. I let mine dry overnight and by morning they were ready for the next steps. Embellishing!

I like to start making my embellishment decisions without making the commitment of sticking them down to begin with. Out comes my trusty clips to help me hold eligible embellies temporarily in their place so I can get a look of what things will look like when viewed together from the top. Once I have things where I like them, it's time to start adhering everything.

For this Want2Scrap™ sheer butterfly beauty I turned her light pink coloring to more of a pinky peach with a quick spray of Suede glimmer mist.

Final touches like this gathering of flowing iridescent ribbons add to the fairy charm of this sweet book. A simple knot of them on the top binder ring makes a fun adornment.
Whew! Are you still with me? That was a plethora of pictures but I hope it gave you the opportunity to get inside the foundation of this album. It's now happily sitting on my desk, bling winking in the morning sun as I type this, waiting for the right photos and stories to come along to nestle among it's pages. Now if you know me, you'll probably assume it's photos of my sweet little girls...and I'm guessing you are right! Have a beautiful day, friends!
Cross Promotional Supplies:
Spellbinders™ Grand Calibur Die Cutting Machine
Spellbinders™ Long Classic Rectangles LG
Spellbinders™ Long Classic Scalloped Rectangles LG
Other Supplies:
Mod Podge
Ranger Stickles
Acrylic paint (white)
Tattered Angels Glimmer Mist
Stampin Up! Stamps, scallop punch and Ink
Martha Stewart glitter
What a stunning project. I just love it.
ReplyDeleteOh my goodness this is so very cute.
ReplyDeleteThis is beyond stunning! I so appreciate all of the tips. I have been wanting to try something like it, but didn't know where to start. http://visionsofpaper.blogspot.com/
ReplyDeleteCan you see me bowing with hands over head...I am not worthy...I am not worthy!!! Just stunning my friend...STUNNING. Fantastic job!
ReplyDeleteI just have to THANK YOU, so very much for all of the delicious details and tidbits shared, within! THIS is some super stunning work! WHAT a WONDERFUL project to devour one day, with a feast of Want2Scrap products - PERFECT!
ReplyDeleteI never thought I could do this. but you examples were great buying this clipboard to use with the DCWV once upon a time collection. tnx
ReplyDelete