Saturday, January 28, 2017

Want2Scrap - It is the Little Things...

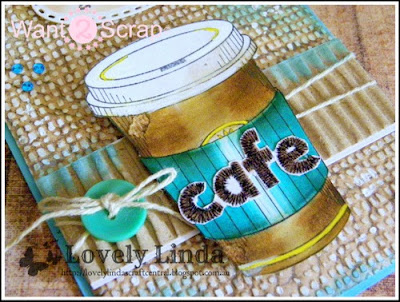
Hello Want2Scrap fans - it is Linda here, sharing a card using one of the fabulous sets from  Sparkle and Sprinkle who have been so very generous to the Design Team.  Now it has to be said that anything COFFEE has my attention straight away - I just had to have the Espresso Yourself stamp set I cannot seem to stop using it! 


The card base has  been cut/embossed using A2 Matting Basics A Card Creator #7 (#1 being the smallest).  The Kraft layer has been cut/embossed using A2 Matting Basics A Card Creator #6, next it has been embossed using Spellbinders Tammy Tutterow Horsehair Embossing Folder .  I have sponged the embossed layer using Imagine Crafts Memento Luxe Ink in Wedding Dress along with Memento Teal Zeal ink.


Adhere a strip of corrugated card across the embossed layer, sponge the top portion using Wedding Dress white ink and Teal Zeal ink.  Tie twine around the front of the card and glue a teal button - secure with a bow.

The Sparkle and Sprinkle image has been coloured using Chameleon Pens and cut out by hand/fussy cut using scissors.  The Coffee Cup has been popped up on Scrapbook Adhesives by 3L 3D Foam SquaresTo make the card pop I have randomly added some of the Baby Bling Rhinestones Turquoise - 100 Count - 2.5mm. 


and the sentiment - I believe it speaks for itself!! Wink:wink


Want2Scrap Supplies:


Thanks so much for stopping by and the lovely comments you leave - they are appreciated.  I hope you are inspired to add some of the beautiful Want2Scrap bling to your projects
.
I would love you to visit me on my Blog: Lovely Linda's Craft Central

Hugs and Happy Creating


Wednesday, January 25, 2017

Nestabling Scalloped Hearts Perfect For Valentine's Day


Hello Everyone, Terre Fry here and today I am showing you a layout of my little girl and her daddy. When I picked out these photos, I knew they would be perfect to use with Want2Scrap© Nestabling Scalloped Hearts, why well because they match Spellbinders Nestablilities Hearts perfectly.
 
My paper choice for this layout was My Minds Eye, I secured all my pieces down using Beacon Adhesives Zip Dry.
 
Want2Scrap© Supplies:
 
Other Supplies Used:
Spellbinders Nestablitlies Hearts
Beacon Adhesives Zip Dry
My Minds Eye Pattern Paper
Red Cardstock
 
Thank you for joining me today here on the blog, I hope you where inspired to create a project usingWant2Scrap© Nestabling Scalloped Hearts.
 
Crafty Smiles,


Monday, January 23, 2017

Want2Scrap Swirls, Pearls and Roses Card

Hello Want2Scrap fans - it is Linda here sharing a pretty shabby/vintage card with you.  I am using one of the chipboard tags from Graphics 45 - these are so pretty.  I have added pearls and swirls - such a gorgeous combination - don't you think!!


My card base has been cut from white card stock using Spellbinders Labels 46 Decorative Elements Etched Die #3 (#1 being the smallest) Cut two #3 Dies, score the top of one at 1cm and fold forward.  Add adhesive to the 1cm portion, attach the front being sure to line up the pattern - an there you have a patterned card base - so easy.

  The insert is also cut using the Labels 46 Decorative Elements #2 and lightly patterned paper.  Using purple ink and a sponge dauber, lightly sponge the ink into the flowers on the patterned paper.  Adhere to the card base using liquid glue.


Pop on the Graphic 45 Tag using liquid glue, add liquid glitter to the butterflies wings, with a small white pearl in the centre.  Glue a double Seam Binding Bow to the left side of the tag and adhere a Mulberry Paper Rose to the center,  I have trimmed the Swirls Finesse - don't you love it that we can do that - so convenient!!  Medium white pearls have been placed around the tag on the filigree portions of the Die cut.

Want2Scrap Supplies:

Cross Promotional Partners: 


Spellbinders:Labels 46 Decorative Elements; Platinum6 Die Cutting and Embossing Machine - 6"
Beacon Adhesive: Zip Dry Liquid Glue
Other: Scrapbook Adhesives by 3L:  E-Z Adhesive Runner, 3D Foam Squares; white card stock;  purple ink, green Seam Binding, 

Thanks so much for stopping by and the lovely comments you leave - they are appreciated.  I hope you are inspired to add some of the beautiful Want2Scrap pearls to your projects
.
I would love you to visit me on my Blog: Lovely Linda's Craft Central

Hugs and Happy Creating


Friday, January 13, 2017

Camera Ready With Finesse Swirls

Hello and thank you for stopping by our blog today, Terre Fry here with a quick and easy card that will only take you 20 minutes or less to create. Ready, Set, Go....Trim your Kaiser Craft pattern paper to fit your 5 x 7 card, use a pre designed card front with sentiment, embellish your card with Want2Scrap© Swirls Finesse Black Rhinestones and Mulberry Paper Flowers. Secure all your embellishments and paper using Beacon Adhesives Zip Dry. See quick and easy!
 
Want2Scrap© Supplies:
 
Mulberry Paper Flowers

Other Supplies Used:
Kaiser Craft Pattern Paper
Beacon Adhesives Zip Dry
White Cardstock
Black Cardstock

Thank you for joining me, hope you where inspired to create your own quick and easy cards! Crafty Smiles,
 

Wednesday, January 11, 2017

Home Decor With 72 Count Pearls

 
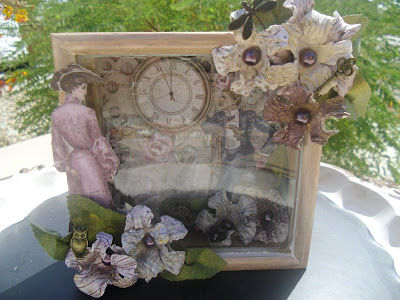
Hello Everyone, Terre Fry here with an altered shadowbox using Want2Scrap© 72 Count Plum Pearls. The paper I am using is from Maja and I die cut my flowers the spritzed them with water and formed them around a standard sized pencil.
 
 
I layered my paper both inside and outside of the shadowbox, adhered everything using Beacon Adhesives Zip Dry.
 
Want2Scrap© Supplies:
 
Other Supplies:
Beacon Adhesives Zip Dry
Maja Pattern Paper
Wooden Shadow Box
Cardstock
 
Thank you for stopping by my post today, I hope you where inspired today to create a home décor piece and embellish it with Want2Scrap© Bling.
 
Crafty Smiles,


Tuesday, January 10, 2017

Softball Overlay from Want2Scrap

Susie here with a fun layout that started with one of the many laser cut Softball themed items available from Want2Scrap!

My husband plays in a softball league with his buddies from work.  Our sons were able to play on the team after high school and I captured these pictures at an evening game. The 12x12 overlay made this layout fast and easy!
I started by removing the white backing paper and replacing it with a green and white patterned paper. I trimmed the outer edge of the overlay a little and centered it on the page. I did need to replace the white paper behind the softball, then I added some photos and embellished with stickers, flair and a Dymo label maker.


I scattered 4 smaller photos underneath the laser cut title.  Don't feel like you need to fill each of the openings with a photo.  You can use them to group pictures and related embellishments.
Remember to check with Want2Scrap for any sports related scrapbooking elements - we have you covered from Archery to Wrestling!  You can find this overlay, along with many other softball themes items, HERE.

Thanks for stopping by and I hope you find some time to play today!  Susie

Want2Scrap Supplies for Softball Layout:

Other Supplies:
  • Paper House Productions Teamwork Chipoxy Stickers
  • Basic Grey Hey Boy Flair
  • American Crafts Picnic Flair
  • Dymo Label maker
  • Arrow die

Tuesday, January 3, 2017

Under the Sea with Heartfelt Creations and Want2Scrap

Hello and welcome!  Susie here today with a quick all occasion card I created with a stamp from Heartfelt Creations and Want2Scrap bling!
I don't have a lot of patience for detailed coloring but that doesn't keep me from using a beautifully detailed stamp. The Under the Sea stamp set has 5 whimsical sea creatures with the most amazing details!
I created a wash of orange and yellow on watercolor paper with Color Burst and then I stamped and die cut some of the little fishies.

One of my favorite things about Heartfelt Creations stamps is that they frequently come with dies that match. It makes it quick and easy to isolate an image and then pop it up off the background for a huge impact.  Here I used dimensional adhesive to add one of the fish on top of an Ultramarine Blue Color Burst background.
I mounted that whole element on black cardstock and then lined the top and bottom with a strip of washi tape from my stash.  The final touch was a double layer of Sleek Strip Rhinestones in 2 colors and sizes - black and turquoise.

Want2Scrap Supplies for Under the Sea Card:

Cross Promotional Supplies:
Other supplies:  Ken Oliver Crafts Color Burst - Ultramarine Blue, Lemon Yellow, Orange; watercolor paper,cardstock, dimensional adhesive, ink, embossing powder, washi tape

 Thanks for stopping by and I hope you find some time to play today!  Susie

LinkWithin

Related Posts with Thumbnails
Pin It button on image hover