Monday, April 30, 2018

Cherished Moments
by: Michelle Hahn

Spring is getting in full swing at the Hahn house, birds are singing, flowers are blooming, 
and my children are spreading their wings and getting ready to fly.  
So every moment, no matter how big or small, is cherished!


Supplies for this card include:  


"The Avenues" paper line from Bo Bunny
8 1/2" x 5 1/2"  The Avenues Courtyard
3"x3 1/4" The Avenues Stripe
3 1/2"x2" The Avenues Stripe
"Cherished moments" card  The Avenues Treasures
Die-namics Mini Royal Roses (die-cut)
My Treasured Kutz-Flourishing Foliage (leaf die-cut)
Spellbinder swirl die cut
----------------
(inside)
All edges are inked with Chestnut Roan cat eye ink pad
5"x3 3/4" The Avenues Stripe
4"c3 1/4"The Avenues Courtyard
Fleur-de-lis strip fromThe Avenues 

Wednesday, April 25, 2018

Want2Scrap Upcycled Boxes

Hello Want2Scrap friends, it is Linda from Down Under.  I have an altered project to share with you today - upcycled, but sadly I forgot to take a photo of the before - what I can tell you is that it has gone from Pinks and Paris to blues and seaside.  I have used a mixture of Want2Scrap bling, chipboard and trim - I love the way it all works together so well - every time!


My youngest daughter handed the original to me because she no longer used it, I knew if I held onto it long enough for her I could work it into her new these - and I was right about that - she loves the new theme and has it in her room with treasures in it - makes us both happy!!


I have started by inking a retired Spellbinders 3D Embossing Folder with seashells all over it, using Imagine Inks in Summer Sky, Desert Sand and Teal Zeal.  This has been adhered to the painted box (I have used blue) using Double Sided Premium Tape by Want2Scrap.  To this I have added the Frame - Round with Leaf Flourish  that has been sponged using Teal Zeal Ink in an ombre fashion.

The Sparkle - Beautiful Script Chipboard Word has been sponged using Desert Sand and Wedding Dress inks and had a coat of irRESISTibles Pico Embellisher in Shimmer applied.  Next it had been glued across the  Frame - Round with Leaf Flourish.

A hinge from the Card Size Antique Keys w/hardware has been glued onto the top left hand corner of the lid and a little Gesso Applied through a homemade stencil.  This has been repeated on opposite corners of the lower section of the lid.  Finishing with Jute - Chenille Braid beneath the Left Flourish with 72 Count Pearls- Light BlueA strip of inked corrugated cardboard has been adhered below the  Jute - Chenille Braid.


Spellbinders: 3D Embossing Folder, Platinum 6 Die Cutting and Embossing Machine; Scrapbook Adhesives BY 3L:  3D Foam Squares; Beacon Adhesive: Zip Dry Liquid Glue;  Imagine Memento Ink in  Summer Sky, Teal Zeal and Desert Sand,  Memento Luxe in Wedding Dress, Sponge Daubers, irRESISTibles Pico Embellisher in Shimmer; Gesso; Homemade Stencil

Thanks so much for stopping by and the lovely comments you leave - they are appreciated.  I hope you are inspired to get your Want2Scrap on!!  
.
I would love you to visit me on my Blog: Lovely Linda's Craft Central

{{{Hugs}}} and Happy Creating


Monday, April 23, 2018

The Avenues
By: Michelle Hahn

Good afternoon blogging friends!

Here's a card I created using one of my favorite paper companies,
Bo Bunny "The Avenues".  Each piece is distressed,inked,and layered for a fun dimensional look.  I love all of the different elements of this card!


Supplies for the front:
Want2Scrap:

Bo Bunny: The Avenues
Treasures
Stripe
Layered Chipboard
Paper Doily


Supplies for the inside:
Want2Scrap:


Paper Doily
The Avenues-Layered Chipboard
Paper-The Avenues Doors
The Avenues Stripes


Thursday, April 19, 2018

World traveler
by: Michelle Hahn

For the last several years, we have participated in a German Exchange program.  This year was no different.  We had a young lady stay with us for about 2 1/2 weeks.  What a joy it was to share life with her.  To commemorate our experiences together, my daughter and I created a mixed media piece to share with them.  We had a great evening, eating, sharing, laughing, and creating!  


Supplies for this project:

Want2Scrap:

5x7 Canvas panels
2x2 Canvas panel
Gesso
Art Anthology- Lattice Stencil
Now Boarding Stamp Set by KaiserCraft
Glimmermist


Wednesday, April 18, 2018

Dear Friend

Hello everyone, Terre Fry here again with another Anna Griffin pre-made card that went from pretty to stunning just by adding some Want2Scrap© bling.


For this card I used one of my all time favorite Want2Scrap© products the Swirls Finesse White Pearls and 72 Count White Pearls. It is quick and easy to take a pre-made card put it together then embellish it with Want2Scrap© bling to make it stunning. Thank you for stopping by my blog post today, hope you found this simple yet stunning card easy to create.

Crafty Smiles,


Monday, April 16, 2018

Want2Scrap Faux Stained Glass with Nestabling

Hello Want2Scrap fans - it is Linda here, sharing a card using one of the fabulous Nestabling combined with Stencils - what is not to love!!  I love the way Nestabling can be used without the co-ordinating die - making it's own statement - afterall 'Diamonds are a girls best friend!' or so it has been said.


I have started by sponging white card stock with Imagine Radiant Neon Inks in Electric Blue, Electric Pink and Electric Yellow and adding some splotches in the same colours and allowed to dry.


Once this has dried I have adhered the Nestabling and coloured inside it using Chameleon Pens - giving an almost stained glass look to the butterflies.  Next I have  I have used the Fleur de Lis Stencil and Electric Yellow and Electric Orange Ink.

  Yellow/white has been added around the front of the card front and secured with a knot and the ends frayed.  A strip of pink flocked paper has been adhered along the right side of the card front and it has been popped up into a pre-cut white card base using 3D Foam Squares.


The sentiment is from the Spellbinders  Live Love Laugh Etched Dies and has been cut/embossed using black card stock and adhered to the lower right side of the card front.  Stickers have been used to complete the sentiment.  

Finishing off with two small strips of  Glitter Washi Tape - Yellow being adhered to opposite corners of the card front and a black button glued to both strips.

Other: Spellbinders: S3-311 Shapeabilities Live Love Laugh Etched Dies On the Wings of Love Collection by Joanne Fink; Scrapbook Adhesives BY 3L: 3D Foam Squares; Beacon Adhesive: Zip Dry Liquid Glue; Imagine: Radiant Neon Inks ink Electric Blue, Pink, Yellow and Orange, sponge daubers; Chameleon Art Products/Pens; 2 black Buttons; Strip of flocked patterned paper.

Thanks so much for stopping by and the lovely comments you leave - they are appreciated.  I hope you are inspired to get your Want2Scrap on!!  Make sure you  visit to see all the amazing products you will need to create your own projects.
.
I would love you to visit me on my Blog: Lovely Linda
{{{Hugs}}} and Happy Creating


Friday, April 13, 2018

Amazing
by: Michelle Hahn

Life is an AMAZING experience.
 Everything from the people we meet, new foods to taste, and new adventures to go on; that's what makes life exciting!  For the last 2-3 weeks, we've hosted a young lady from Germany.  It has been a joy to walk with her step by step and do all of these.  


Cheers to an AMAZING life!


Supplies for the front of the card:
Want2Scrap 
Bo Bunny paper "The Avenues"
Base card is 8 1/2" x 5 1/2" The Avenue Shutters
3 3/4" x 5" The Avenues Courtyard
3 1/4" x 4 3/4" The Avenues Stripe
"Amazing" The Avenues Treasures
All edges are distressed and ink with Chestnut Roan Chalk ink pad
Twine by American Crafts
Flourishing Foliage by My Treasured Kutz

Supplies for the inside:
3"x5The Avenues Stripe
Door knob The Avenues Treasures
Dark tan trim

Thursday, April 12, 2018


Hello everyone, Terre Fry here with another quick and easy card you can create in 15 minutes or less, with the right products. Today I am using an Anna Griffin card kit, to kick it up a notch, I used 2 different Want2Scrap© bling products to enhance this already stunning card kit.


For this card I used the Sleek Strip 6" Black Rhinestones and the Nestabling Beaded Square Black Rhinestone to enhance this beautiful card. See just how easy it is to turn a pre-made card kit into something that is quick and easy but also stunning.
 Hope you like this simple card, make sure to check out all the beautiful bling here at Want2Scrap©

Crafty Smiles,

Tuesday, April 10, 2018

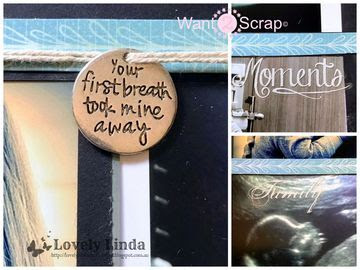
Want2Scrap Your First Breath Layout

Hello Want2Scrap friends, thanks so much for stopping by!  It is Linda here sharing a layout created using Want2Scrap© products.   I have used one of the 12x12 Overlays,  I love the sentiment and it is also a favourite with my DD2 - it is perfect for these precious moments.  You can see the other products that I have used as you follow along with the tutorial.


Where do you start on a layout - the 12 x 12 Overlay takes a lot of the 'overthinking' out of it for me.  I started by adding blue card stock behind the sentiment - securing using  Double Sided Premium Tape by Want2Scrap - 1/4" x 150 yardsThin strips of patterned paper have been adhered across the layout between each row of photos. 


One piece of Floral Border 4 Pack - Chipboard Embellishment was adhered to the top corners, then sponged using Imagine Wedding Dress ink, followed by highlights of Teal Zeal - using a sponge dauber.  A large flower from Little Birdie Crafts Paula - Artic Ice  has been glued to the centre of the Floral Border and  two flowers from the Little Birdies Valarie - Artic Ice has been adhered yo each side of the flower.

Swirls Finesse - Le Creme Pearls - 2 Pack Self Adhesive has been trimmed and added to each corner - popping out from under the flowers.


our first breath took mine away - Antique Silver charm has been adhered between the top two photos, using twine that has been wrapped around the layout and secured at the back using glue.  The matching sentiment is the perfect addition. Sentiment Stickers from my Stash have been adhered to the photos.


Other: 
3Scrapbook Adhesives BY 3L: E-Z Dots Permanent Refillable Dispenser, 3D Foam Squares; Beacon Adhesive: Zip Dry Liquid Glue;   Imagine Memento Luxe Ink in Wedding Dress, Memento Ink in Teal Zeal Chameleon Pens; Blue Card stock; Little Birdie Crafts: CR694554 Paula - Artic Ice Flowers, CR69653: Valarie - Artic Ice Flowers; Strips of Blue patterned paper; Prima: Word Stickers

Thanks so much for stopping by and the lovely comments you leave - they are appreciated.  I hope you are inspired to get your Want2Scrap on!!  I will be sharing more pages as I go along and hope you will be inspired!
.
I would love you to visit me on my Blog: Lovely Linda's Craft Central

{{{Hugs}}} and Happy Creating


Wednesday, March 28, 2018

Treasures of the Heart with Want2Scrap

Hello Want2Scrap friends, it is Linda from Down Under.  I have a pretty card to share here today - perhaps a touch nostalgic. I have used a mixture of Want2Scrap bling - I love the way it all works together so well.


The card front has been created using the Spellbinders Pierced Rectangles Etched Dies #5 #6 together (#1 being the smallest) and patterned paper. This has been popped up onto yellow card stock using Scrapbook Adhesives BY 3L: 3D Foam Squares


The Graphic 45 chipboard embellishment has been popped up onto a white Hemstitch Oval  that has been cut/embossed using white card stock and popped up onto a tag and then the card front using Scrapbook Adhesives BY 3L 3D Foam Squares. 

The Get Well Soon Scalloped Circle Etched Die has been cut/embossed using white card stock.  The Doily has been trimmed and a portion tucked into the tag, secured using liquid glue.


A strip of yellow lace has been adhered across the lower portion of the card front using Double Sided Premium Tape by Want2Scrap - 1/4" x 150 yards, below the chipboard embellishment - this has been secured at the back using  Beacon Adhesive Zip Dry Liquid Glue. 


Flowers have been cut/embossed using the Cinch and Go Flowers Etched Dies in various sizes, they have been layered and arranged around the bottom left hand corner of the Chipboard Embellishment.  Swirls Finesse - White Pearls have been trimmed and added to each side of the flowers.

50 Count - Pearls - White have been coloured using Chameleon Pens, a lace butterfly embellishment has been glued onto the left hand edge of the doily, with a shimmery button added and a coloured white pearl added to the centre and to the hole in the chipboard - a perfect fit.


Want2Scrap Products:
Other: 
Spellbinders: SCD-012 Nestabilities Celebrations Pierced Rectangles Etched Dies, S4-831 Shapeabilities Get Well Soon Scalloped Circle Etched Dies Thoughtful Expressions by Marisa Job; S6-050 Shapeabilities Amazing Paper Grace Cinch and Go Flowers Etched Dies; Scrapbook Adhesives BY 3L: E-Z Dots Permanent, 3D Foam Squares; Beacon Adhesive: Zip Dry Liquid Glue; Lace Butterfly; Graphic 45: Chipboard Embellishment

Thanks so much for stopping by and the lovely comments you leave - they are appreciated.  I hope you are inspired to get your Want2Scrap on!!  Make sure you  visit to see all the amazing products you will need to create your own projects.
.
I would love you to visit me on my Blog: Lovely Linda's Craft Central

{{{Hugs}}} and Happy Creating

Monday, March 26, 2018


Hello Everyone, this post is all about birthdays, I have created 5 different birthday cards using several different Want2Scrap© products. The first card, uses Baby Bling Silver Rhinestones and 72 Count Silver Rhinestones.


The 5th and final cards uses Enamel Dots 8mm Turquoise.

I hope you have enjoyed these 5 simple and quick cards. Until next time Crafty Smiles,


LinkWithin

Related Posts with Thumbnails
Pin It button on image hover