Wednesday, November 30, 2011

Want2Scrap Guest Designer: Holly Simoni Felt Christmas Journal

I love this wonderful creative and festive  Felt Christmas Journal created by our guest designer Holly Somoni. She has created another wonderful project for us and I LOVE IT!
She created this Felt Christmas Journal to document Christmas memories.  She adhered Christmas lists, letters to Santa, traditions we have, photo's, journeying about snowshoeing trips, etc. What a wonderful way to remember the special holiday moments.

Nestabling Fleur de Lis Rectangles Red & Silver Rhinestones

Nestabling Fancy Tags Two Turquoise Rhinestones

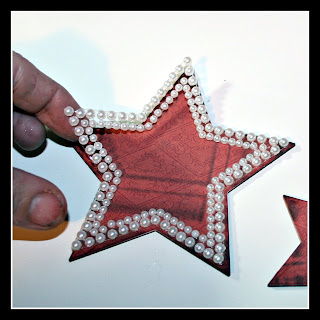
Funky Swirls - White Pearls - Self Adhesive. 2 sizes in each

Composition Notebook
KaiserCraft - Silly Season Collection patterned paper
Core-dinations Cardstock - Core Couture - silver cardstock
Scor-Tape by Scor-Pal
3D Foam Sqaure Adhesives by Scrapbook Adhesives By 3L
100% Wool Felt by Felt On The Fly - Etsy Shop


Such wonderful details.


Thank you so much for this wonderful project that will be a true family heirloom. These memories will be the true gift of the holiday the ones in the heart not in a box.

Heirlooms

(Amy Grant)

Up in the attic
Down on my knees
Lifetimes of boxes
Timeless to me.
Letter and photographs
Yellowed with years
Some bringing laughter
Some bringing tears.
Time never changes
The memories, the faces
Of loved ones, who bring to me
All that I come from
And all that I live for
And all that I'm going to be.
My precious family
Is more than an heirloom to me.

Please visit Holly at her blog: Wild Wyoming Art Cafe'

Thank for joining us today!


Monday, November 28, 2011

Urgent Message from BLING central:


The HOLIDAYS are here: apply BLING liberally, and often!


It's official, friends! Those turkey sandwiches are probably losing
a bit of their splendor by now, and your thoughts might be turning
towards more altruistic pursuits: gifting! Whether or not you're looking
for the sparkliest socking stuffers, RAW materials for stunning craft,
or ideas for WHAT to do, with your sparkliest notions - Want2Scrap™
is your place! Hopefully, you got a chance to get down and dirty with
the FANTASTIC "Black Friday" specials, here at Want2Scrap™, but
even if you missed it - we STILL have the greatest selection of unique
and stunning bling, priced well, ANY time of year... * Just wanted to
share that, before I unroll some enabling... uh, er, I mean IDEAS to
share with ALL-o-YOU! INSPIRATION - all sizes and styles - FREE!


Teaming some of the MOST luminous bling, ATC chipboard
cards from EcoGreen Crafts, FABULOUS Chirstmas paper,
and random bits of nostalgic fabulosity, I made a banner!


Banners are FUN, easy and SATISFYING to create...
Plus, you can DUMP a lot of splendid goodies to really
show off your crafty side - it's a WIN*WIN project to
jump start your holiday crafting! All you need is a little
planning, and TERRIFIC bling!


I love a "meaty" craft assignment, where EVERY bit and bauble
can find a home - note my leftover bits from these INTOXICATINGLY
beautiful Nestabling™ circles - I save EVERY last bit for embellishing
"emergencies" - such as STARS that need a hint more sparkle!

Of course, for tiny bits, never, ever, EVER, underestimate the
importance of Want2Scrap's line of baby bling!
Helloooooo - Rudolph's SHINY nose! So SPARKLY!

{Make sure you pick some up - g'head, I'll wait while
you drop some in your cart... Yes, get ALL the colors!}


A few inches of leftover scallop oval bling was SUCH the perfect
addition to my tiny bit of die cut Christmas tree - I'm telling you,
THIS is the season for BLING! Dump every BIT, we'll make MORE!


As the banner is built, plan the use of sentiment or word,
and then use bling to accentuate your message. I used some
great sentiments from a printed piece of Cosmo Cricket
Christmas paper for my message, against a backdrop of mostly
October Afternoon and Reminisce papers - that I LOVE, with
all my heart! As you will see, each panel dictated it's own
bling application - I love to pull out A LOT of Want2Scrap™ bling
patterns that could apply to my project and just let the creation do
it's THANG! This was one that nearly MADE itself!


This fabby strip of blinged out goodness is from a pack of
Nesabling™ diamond shapes - YEOWZA!


I'll NEVER tire of how, stunningly, bling makes stars shine!


AND, nothin', I mean NOTHIN' says "Happy" like this
rectangle of blinged OUT goodness from this green and blue
Lattice collection
! (Ooooooow - I'm happy all over again!}


More LEFTOVER bits, to get it DONE!


Finally, weave some embellishment wire through the
entire sequence of designs, including VINTAGE Christmas
lights - nope, they don't light, but I LOVE 'em! Heavily
enameled, VINTAGE Christmas goodness - but, there is
no chance these will outshine the TRUE superstar here -

Da BLING!


This is a project, bound to keep you smiling...


ALL SEASON!


YIPEEE!

Thanks for allowing me the opportunity to share this fun
little project and my deep and profound love for Want2Scrap™
BLING! Enjoy!


Friday, November 25, 2011

Christmas Bling, Bling a Bling!

Hello again. I hope everybody had a Wonderful Thanksgiving, with lots of family, friends, and good food. We had to cancel our plans because both DH and I have been sick with colds and flu, but we still have plenty to be thankful for.

My project today is truly one of my favorites. The Christmas theme around our house this year is bling, and more bling; the more the merrier I say LOL!! From top to bottom this project is approx. 7" long, and I had a hard time taking a good picture. When this piece was finished I was ready to put up my Christmas tree. Enjoy the Season :)

I made a quick step-by-step video showing you how this lovely project was created.

Thanks for visiting today - Linda


Supplies Used:

Want2Scrap™

Nestaboard Labels Twenty

Nestabling Labels Twenty - Silver


Cross Promotional Products:

Spellbinders™

Labels Twenty Nestabilities®

Layered Poinsettia Shapeabilities®

On The Vine Border Grand Shapeabilities®

Beacon Zip Dry Glue


Other Products:

Lost & Found Christmas Cardstock - My Mind's Eye

Image from Christmas Images & Journal Notes - Crafty Secrets.

May Arts Silver Cord, and Wrinkle Ribbon.

Crystal Coarse Glitter.

Tape, 2-Way Glue.

Ranger Acrylic Paint Dabber.

Maya Road Trinket Beads - Dangling Chandelier

Silver Beads.


Thursday, November 24, 2011

Distress, no mess! Happy Thanksgiving!

It looks like another "get your hands messy" kind of day! I decided to create this tag to add to the planter that will sit at my Thanksgiving table using lots of Want2Scrap™ products .

A few details...

This is what you will need:
Distress ink or stains
Spray ink
Paint
Faber-Castrell Gelatos
Tag, water, paintbrush

I started off staining both the cardboard and Nestaboard™


Now add a little paint to the edges and crevices...you can use a brush or just a finger.

Now used distress inks to distress the edges of your materials.

Use the spray inks to distress your tag.

Color the envelope with gelatos and add a little water to them to spread. It brings on a water color type of look.


Hope you are enjoying your holiday and find time to get a little messy yourself!


Want2Scrap™ products:
Nestaboard Labels Eighteen™
Chipboard Embellishments - Style A
Nestabling Petite Scalloped Circles in Silver
72 Count - Silver Rhinestones

Product Partners:
Beacon Adhesives

Other Products"
Ink- Ranger
Paint- Claudine Hellmuth
Spray Ink- Tattered Angels
Walnut Stain- Fiber Scraps
Faber-Castell Gelatos
Pattern Paper- Lily Bee, Websters Pages
Alphabet- K & Company
Other- Cardboard, Tag, Envelope, Placecard

Monday, November 21, 2011

Black Friday Sale


Come visit us from Midnight November 24 thru Midnight November 26 for our Black Friday Sale that will knock your slippers off!

50% off most items and .99 cent BLING!

(This special available to retail customers only)

www.want2scrap.com

Friday, November 18, 2011

Holiday Greetings...keep it simple, Sweetie


Hello my festive friends!  Nothing says holiday love like handmade greetings and package embellishments.  But, let's face it, while I am MOST *needing* to be creative because I am so inspired by the holidays, I am also the MOST busy trying to fit it all in!  So my projects today are here to remind us to "keep it simple, Sweetie" by using our creative talents and gorgeous Want2Scrap™ products to make our own unique touches for packages and greetings without driving ourselves fruitcakes!


My first set of tags were made mostly with scraps!  Check out the bit of Swirls, Finesse - Silver Rhinestones - 2 Pack - Self Adhesive on the left hand tag.  Literally the tiniest bit of leftover swirl bling too pretty to discard gives this tag that something special!  Same with the center tag and it's  leftover corner from Nestabling Lattice Rectangle Black & Silver Rhinestones .  The corner by itself makes a perfectly pretty cornice for the top of my tag.  Also proving itself to be the most useful bling in the bin 72 Count - Silver Rhinestones - Self Adhesive decorates the scalloped edges and tops my triangle trees.  Seriously, if you haven't already, just go ahead and hoard silver bling from Want2Scrap™...it's totally normal!  (right!?)


Next up is a super quick and easy card that can go postal with it's flat profile, no problem. 


The real workhorse on this card is the glittery laser cut Winter Wonderland Title Strip!  It comes pre glittered and beautifully laser cut in one piece as shown above.  The glitter does not come off!  So if you avoid glitter in the craft room like the plague because it's too messy, have no fear, this lasercut will give you sparkle and shine without the mess.  A simple clip with scissors made my title strip two pieces and, of course, I couldn't resist more sparkle with 72 Count - Silver Rhinestones.


There you have it, one custom greeting card and three gift tags ready to rock around the Christmas tree in no time at all.  I hope this gives you some inspiration to "keep it simple, Sweetie" so you can be creative and still enjoy real reason for the season.  Turn to you friends at Want2Scrap™ for simple holiday greeting solutions with the same sparkle and shine as the lights on your tree!  Wishing you all a wonderful holiday season.... 

Want2Scrap™ supplies:

Cross Promotional Products:

Other Products:
Cardstock: Papertrey Ink
Overlay: Hambly Screenprints
Punch: Stampin Up! and fiskars
Pen: Red Sharpie
Trim: Holiday silver tinsel and red, white and green yarn
Craft Supply: wood bead


Wednesday, November 16, 2011

Want2Scrap™ November Guest Designer - Holly Simoni

Good morning blogging friends! Today, I am thrilled to share a Beautiful projects with you from our November Guest Designer, Holly Simoni. Throughout the post Holly has several tips that she shared for creating her project.


Holly designed this stunning 12 Days of Christmas wall hanging!! There are SO many details and check out all of that BLING!! Holly said that she used coordinating patterned paper collection that includes several hues, this way she was able to incorporate many different colors of Want2Scrap products and include fun colored bling like red and green along with the black, silver, white, mocha!


Holly used Spellbinders, Labels, Shapeabilities, and Nestabilities die templates to find the perfect size of die cut to fit behind each vintage label holder. She varied the size, shape and color of all 12 die cuts.


To embellish her project Holly used smaller die cuts, metal objects and even more Want2Scrap products and painted a few die cuts with glimmer glam.

Holly used fuzzy chipboard numbers represent all 12 days of Christmas.


The Christmas tree stamp is from the O Christmas Tree stamp set by JustRite and has the entire 12 days of Christmas on it. This 12 Days of Christmas project would make a great gift as well! All of the supplies that Holly used to create this stunning 12 Days of Christmas wall hanging are listed below.

If you missed the first blog post to introduce Holly you can click HERE to check it out. Also check out all of the places you can find Holly's creative work.


Holly, thank you for creating such a Beautiful Christmas project!!

Thank you so much for stopping by today!

Hugs,


Want2Scrap


My Mind's Eye
Lush ~ Flocked Chipboard Alphabet Stickers
Holly Jolly patterned paper
Life Stories Collection

Graphic 45
Staples Collection ~ Metal Buttons

JustRite Stampers
O Christmas Tree ~ Cling Stamps

WorldWin Papers
Treasures ~ Cream, Red

Tattered Angels
Glimmer Glam - Chandelier

Buttons Galore
Buttons

Beacon Adhesives
Zip Dry Adhesive

7 Gypsies
Vintage Receipt Holder (12x12")

Tim Holtz
Metal Keyholes

Other ~ Red Ribbon, Dymo Label Maker

Tuesday, November 15, 2011

Sweet & Sassy Birthday

Good morning blogging friends! Today I have a fun, bright and cheery birthday card to share with you.


Personal, I am not usually one for the brighter colors but I had so much fun coloring this fun toppsy turvy cake image from JustRite and adding all of the pretty and colorful bling from Want2Scrap®.


I used Copic markers to color the image and then used Spellbinders™ Grand Calibur Die Cutting Machine and S4- Labels Fourteen to cut/emboss the shape. Then I layered the die cut, Nestaboard Labels Fourteen and Nestabling Labels Fourteen Hot Pink Rhinestones. I colored the paper doily with glimmer mist and added some die cut accent pieces from S5-071 Twisted Metal Tags & Accents.


For the rose I used S4-352 Spiral Blossom Two from Spellbinders. Once the rose was rolled I added glimmer mist and glitter to match the Nestabling and Ribbon. The ribbon is from Really Reasonable Ribbon. I also added some Baby Bling Turquoise Rhinestones to the cake and corners of the card and Baby Bling White Pearls to the swirl die cut accents.

Thank you so much for stopping by today! I hope you have a wonderful and creative day!!

Hugs,


Want2Scrap Products Used:
Nestabling Labels Fourteen Hot Pink Rhinestones
Nestaboard Labels Fourteen
Baby Bling Turquoise Rhinestones
Baby Bling White Pearls

Cross Promotional Products Used:
Spellbinders Grand Calibur
S4- Labels Fourteen
S4-352 Spiral Blossom Two
S5-071 Twisted Metal Tags & Accents
Beacon Adhesives 3-in-1 Advanced Craft Glue

Other Supplies Used:
Paper: Discount Cardstock Simply Smooth White, Bazzill Swiss Dot Salt, Frosted Pink Prismatic, Frosted Teal Prismatic, Lime Denim
Stamps: JustRite Stampers Clear CR-02230 Topsy Turvy Cakes
Ink: Tsukineko Memento Tuxedo Black, Ranger Antique Linen, Copic Markers
Accessories: Really Reasonable Ribbon Shimmer Satin Bright Assortment; Clearsnap Pralines & Cream Fairy Dust Glitter, Glue Gloss, Pink Chalk Ink; Tattered Angels Caribbean Blue, Timeless Lilac, S.W.A.K. Glimmer Mist; Flower Stamens; Paper Doily; Scrapbook Adhesives by 3L 3D Foam Squares

Monday, November 14, 2011

Star Light Star Bright **Karen Taylor**


Greetings on this wonderful Monday morning !


Today I want to share some fun ornaments, or they could be toppers for gifts that you can create this season.
This would be perfect for a teacher, friend, secret Santa gift, neighbor or even to adorn your own tree.

This is also a great project for girl scouts or to do with your own children for gifts for grandma's and grandpa's to cherish!

I remember at night in the summer looking to the sky and making my wish on that first star....how special a simple symbol is to us...it brings us hope and faith.....and a childhood since of wonder.

Twinkle Twinkle Little Star

Twinkle twinkle little star, how I wonder what you are?

Up above the world so high , like a diamond in the sky

When the blazing sun is gone, when he nothing shines upon,

Then you show your little light, twinkle, twinkle all the night.

Then the traveller in the dark, thanks you for your tiny spark,

He could not see which way to go, if you did not twinkle so.

In the dark blue sky you keep, and often through my curtains peep,

For you never shut your eye, 'till the sun is in the sky.

As your bright and tiny spark lights the traveller in the dark,

Though I know not what you are - twinkle, twinkle little star.


FOR MY STARS:


I started with Want2Scrap™ Nestabling and Nestaboard Stars Five, I used 2 packs of both and SpellbindersGrand Calibur™ and Stars Five Die template.

Using Christmas Paper by Donna Salazar I cut out a bunch of stars using the Grand Calibur.


I adhered paper to some of the stars and then inked the edges using Clearsnaps Mixed Media Inx by Donna Salazar.


I attached Nestabling to random stars.


Others I painted using Eco Green Paint

Inked the edges and added Clearsnap Fairy Dust Glitter by Donna Salazar. Sparkle stars...and some with bling.....things are looking SO pretty!


I then layered in random orders using plain die cut stars without Nestaboard and some with for added dimension.

Punched a hole in top and added ribbon and three jingle bells to each bows center.

I just love that each have a different look.....

depending on colors you use.....

the bling chosen.....


and how you stacked the paper stars with the Nestaboard stars....so different but all so beautiful!

I WILL be making more of these delightful stars to share with friends and loved ones during this holiday season. No matter your beliefs a star is always a symbol of hope and faith.


For my Project I used :

Want2Scrap:

Want2Scrap™ Nestabling and Nestaboard Stars Five


Cross Promotional Products:

Spellbinders Paper Arts: Grand Calibur and Stars Five Die Templates
Eco Green Crafts Paints

Other:

Paper, Clearsnap Mixed Media Inx and Fairy Dust glitter by Donna Salazar
Jingle bells, ribbon, vintage seam binding and wire


Until next time...BE CREATIVE!

Karen Taylor

Christmas gift suggestions: To your enemy, forgiveness. To an opponent, tolerance. To a friend, your heart. To a customer, service. To all, charity. To every child, a good example. To yourself, respect."

~ Oren Arnold

LinkWithin

Related Posts with Thumbnails
Pin It button on image hover