Showing posts with label Nina Brackett. Show all posts

Monday, December 19, 2016

Want2Scrap and Peachy Keen - Mixed Media Card

Hello and welcome!  Susie here today with a mixed media card featuring a stamp from Peachy Keen and Want2Scrap bling!
I created the background with Ken Oliver Color Bursts on watercolor paper.  I trimmed it down and inked the edges before mounting it on cardstock.
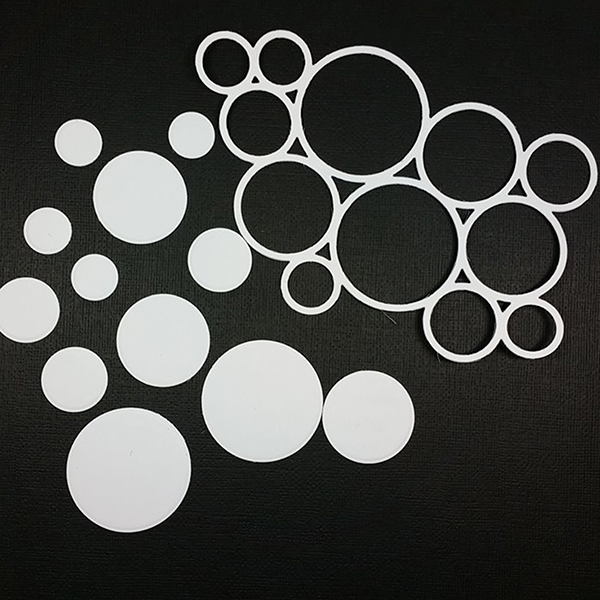
I used Spellbinders Cascading Circles die to cut white cardstock.
 

I used a stamp from the Peachy Keen In the Garden 1-1/8" Face Set to stamp on vellum with permanent black ink.  I colored the eyes from the backside with a sky blue marker.

I wanted to adhere the face behind one of the holes in the die cut so I trimmed the vellum down and added Zip Dry glue to the backside of the die cut.

I also used Zip Dry to adhere the entire die cut onto the Color Burst background.  Heres a close up of the stamped face on the card.

I pulled out Nina Brackett's Let It Snow bling and chose a snowflake for the upper right of the card.

Want2Scrap Supplies for Snowflake Card:

 Cross Promotional Supplies:
Other Supplies:  Ken Oliver Crafts Color Burst - Ultramarine Blue, Lime Green, Turquoise; Dymo Labelmaker; watercolor paper, inks, marker

Thanks for stopping by and I hope you find some time to play today!  Susie

Wednesday, January 23, 2013

Embellishing a Store Bought Frame

We love our preferred partners. When I saw these papers from Authentique, I was so immediately inspired to start crafting.


I started with a plastic frame from Ikea. First off, I could not believe this was plastic, it's so NICE!
I die cut several flowers using Spellbinder's Spiral Blossom.

Most of the other pieces are ready made.
The Bird on a Branch is a silhouette.
I used one of Donna Salazar's Puzzle Pack pieces and covered it with yellow patterned paper,
distressed it by sanding, and glazed it with glossy accents.

Then, it was time to drip the bling.
I took Sleek Strips and made a few cuts so I could round the corners of the inner opening.
I carefully trimmed around the butterflies from the Wonderful Wings Nestabling set, and left the clear backing intact, and just glued using a glue dot. Finally, I added some strips of Nina Brackett's gorgeous Chevron Bling Border to the tabbed card.


This project really didn't take very long, but I'm so pleased with the results.
What do you think?

Want2Scrap Supplies

Donna Salazar's Puzzle Pack
Sleek Strips - Silver

Preferred Partners

Authentique - the Renew Collection
Spellbinders - Spiral Blossom One
Beacon's Adhesive - 3-in-1

If you love this paper and would like to see some more projects I created with it, check out my blog post here.

Thanks for stopping by today. Check out Today's Special at Want2Scrap.


Friday, January 11, 2013

More Thank You Cards

Nina here again with two more Thank you cards. You can see my first one on a previous post. I followed a basic sketch to make it easy to mass produce these post-holiday vintage thank you cards. First, I stitched the Melissa Frances patterned paper on to the card front. I accented the doily with Nestabling Heart Circles Pink Pearl.

W2S-Card

The sentiment is from The Craft's Meow's Stitched Sentiments set. The Red Rose Ribbon 1" was adhered to the center of the bow. The papers, resin and sticker are by Melissa Frances.

W2S-Card-det

I was able to use several from one Nestabling Heart Circles Pink Pearls pack. As you see, I used the smaller one on my card above and the biggest one on the one below.

W2S-Card3

This sketch is also good for using scraps. Here I used a Melissa Frances sticker.

W2S-Card3-det

I hope you were inspired to make your own thank you cards by today's post. Thank you for your visit!

Want2Scrap Products used:

Cross Promo Products used:
The Craft's Meow's Stitched Sentiments

Come visit me on my blog, Crafting in Croatia.

Friday, January 4, 2013

Thanks a Bunch

Hello, friends! I hope you have recovered from the holiday festivities. Now that the gifts have been unwrapped and hopefully enjoyed by you, it's time to get creative to send thank you cards to the thoughtful people who sent you those wonderful gifts. Here is one of a series of cards I made using some of my Want2Scrap products.

I covered the Vintage Phone by Laurel Lane - Chipboard with some wet glue and covered it with Art Glitter glitter. I accented the doily with Nestabling Heart Circles Pink Pearl.

W2S-Card2

The sentiment is from The Craft's Meow's Stitched Sentiments set. The Red Rose Ribbon 1" was adhered to the center of the bow. The papers are by Melissa Frances.

W2S-Card2-det

I will be sharing two more of these thank you cards on my next post. Have a great day!

Want2Scrap Products used:


Come visit me on my blog, Crafting in Croatia.

Sunday, December 30, 2012

Bling in the New Year


I really can't make a post about the New Year without
first wishing my daughter a very happy

S E V E N T E E N

Yes, it's my daughter's birthday.
17 years ago today, she made her way into the world.
Wasn't it yesterday?

Something fun I do with my daughter is
go on Dollar Store shopping sprees once in a while.
You can buy a bunch of fun things,
and still have money left for BLING!
The last time we were there we got some fun
horns, glasses, and bubbles for New Year's.

We enjoy have fun, corny celebrations!

The horns were really cheesy though, so I decided
to decorate. At 3 for $1, I decided to tear one up
to make a pattern. I traced it onto patterned paper - 
both from our friends at Authentique.
I made a little extra piece for the top area.

I glued all this together and added stickers 
from SRM Stickers, and of course ...

B L I N G

I cut apart some Beautiful Bling Borders for around
the horn and the upper part that divides the pink and the grey.
I used a large Sleek Strip at the top,
and a small Sleek Strip at the bottom, near the horn. 


Thanks for looking.
Happy Birthday to my sweetheart, and
a very Happy New Year to all of you.

Be safe, be well, be happy, and be creative as you 

BLING IN THE NEW YEAR!!!


P R O D U C T S


Promotional Partners


Other

SRM Stickers


Saturday, October 20, 2012

4 Minutes of Superhero Coolness

This summer, my son had the opportunity to tour a firetruck, complete with his own "Assistant" fireman.  He thoroughly enjoyed the opportunity, and sitting in that drivers seat made him feel 10 feet tall.  This is one of the photos I captured from that afternoon.

I knew when starting this layout that I wanted to use a long, multi-font title, so I painted a Nestaboard from Labels Twenty Five as the background for my title.  I think it allows your eye to easily read my title, because it's confined to one place.  It also really emphasizes the title as a design element, which I love.


Thanks for coming by!

Want2Scrap™ Products Used:
Beautiful Bling Border- Chevron

Partner Products Used:
Beacon Zip Dry
Authentique Alphabet

Wednesday, August 15, 2012

Want2Scrap Guest desinger Julie Ranae


We are proud to share August's


Guest Designer Julie Ranae.


Julie Ranae


Julie Ranae comes from The Forest City of Rockford, Illinois. She has been married to her British-import husband Paul for 22 years and is the mother of two children and Mema to four grandsons.
Her professional background in retail marketing & consulting eventually led into her opening the largest rubber stamp and paper-crafting store in Illinois. She has gone on to organize paper-crafting events and workshop and retreat weekends which have drawn crafters from all over the world
In June 2009, she began a new journey with her creative blog Julie’s Open Window. It quickly became an outlet for her passion of creative writing and a place to share her work. Recently celebrating her 3-year ‘blogaversary’,she is honored that nearly 1100 ‘fabby friends’ have become followers and participate in a variety of blog hops, challenges and fun when they visit.
She is the creator of the very popular weekly color challenge, The Play Date Café& co-creator of the Clean & Simple Challenge, CAS-ual Fridays . She is also the Design Team Coordinator for The Twinery& The Craft’s Meow, a designer for EAD Designs and Marketing Coordinator for StopandScrap.com.

Her work in the rubber stamping industry has been featured in a variety of trade publications and her designs have been featured in Scrapbook News & Review, Paper Craft Planet, CARDS/Create and Moxie Fab World.
She is a huge fan of Skype and is constantly in front of the mirror, checking her makeup...
just in case someone calls! (I love that)
Here are some LOVELY projects she has created for your enjoyment!
You are going to love what she does with Want2Scrap products!


love that pearl flourishes continue to be such a wonderful
accent to cards and that's what I chose to spotlight on this one.
Last week, I mentioned that I was kinda getting back to the
'BOO' idea (you can read about that HERE) so I pulled out
some great papers by BasicGrey for my 'wallpaper' background
that I got from StopandScrap.com
{they have THE BEST prices on all the NEW CHA stuff ! ! }
From there it really was a matter of layering all good things
until I was happy with the result.
I haven't played with a 'shabby-chic' look for awhile,
so it was fun to play with all these great textures.
Project Recipe:
Patterned Paper: PBJ by BasicGrey from StopandScrap.com
Cardstock: from WeRMemory Keepers
Stamps: Ladies & Gents by The Craft's Meow
Embellishments: pearl flourish from Want2Scrap
net flower by Recollections, seam binding from Hug Snug
chevron ribbon by Amy Tangerine for American Crafts
Sentiment sticker by American Crafts
Alpha stickers by October Afternoon
Tools: Labels 18 by Spellbinders, Big Shot


I love this set of Stickerz called 'London Town' and thought it was
fitting for the festivities of the last two weeks.
These designs are all outlined in black and could easily be
colored in with your Copics or any alcohol-based marker.
I chose to keep it quite simple using bling from Want2Scrap
to light up the 'London Eye'
Project Recipe:
Cardstock: Pure Luxury by Gina K Designs
Embellishments: London Town Stickerz by EAD Designs
bling by Want2Scrap
 On Julie's last card she
thought the colors on this card worked really well
for the newest challenge over at The Play Date Café too! AND we agree...love this color combo. Once that is a great contrast and really highlight her design!


Project Recipe:
Cardstock: Pure Luxury by Gina K Designs
Patterned Paper: Sugar & Spice by Doodlebug Design
Stamps: Stitched Flowers & Sentiments by The Craft's Meow
Embellishments: pearls from Want2Scrap
Join us here again on August 30 as Julie share more ispriation. All of us here at Want2Scrap can not wait to see the next amazing creation by Julie!
A huge thank you to Julie for joining us and make sure you check out her blog and web pages to be insprired and to see the other great products as well as The Play Date Café  Color Challenge! Join in the fun at The Play Date Café and tell them you saw Julie and her wonderful creations here at Want2Scrap!
Visit Julie's blog to enjoy all her creative inspiration!
The winner from our blog hop with The Craft's Meow from right her at the Want2Scrap Blog is:

Love your elegant layout! Thanks for the blog hop...it's been fun!
Please email me at karentaylor1111@hotmail.com

We will announce the winner from the Hop comments on our designer's page today on Facebook! So keep your eyes open and join us at:


Remember you have until midnight eastern time to share post on our Facebook page to win a Gift Certificate...so get on Facebook and share your favorite Want2Scrap products, posts and projects!

Thank you so much for joining us! Have a Fantastic Wednesday and remember...from all of us here at:
"It ain't got a thing if it ain't got the bling!"

Saturday, May 19, 2012

Pretty floral and bling tags


Hello friends!  Dana here with some quick gift tags that are quick and easy with a great vintage feel.


I began by misting four medium Manilla Tags from Want2Scrap with mists by Tattered Angels and Clearsnap Smooch Spritz.  Leave them to dry or speed the process by drying with a heat gun.


Next, a touch of bling from Beautiful Bling Borders-Fancy That! by Nina Brackett.  Use scissors to cut the bling strip into four sections and then each again to provide a top and bottom "bracket" like I assembled them above.


Adding a stamped oval frame, stamped,die cut and glittered butterfly, paper flower, trims and 72 Count - Coral Pearls - Self Adhesive is a snap!  And before you know it....


....you've got a whole collection ready for gift giving!  Thanks for stopping by.


Want2Scrap® Products used:
Cross Promotional Items used:
Paper: Botanique by Donna Salazar- 12x12 Paper: Stationery
Glitter: Clearsnap - Fairy Dust Glitter
Other:
Twine: The Twinery
Ink: Stampin Up
Stamps: Papertrey Ink and Wilson Designs Stamps
Die: Papertrey Ink
Paper Flower: Prima
Craft supply: lace

Tuesday, May 8, 2012

A cupcake with a flower and bling twist!

Cupcakes are a wonderful way to celebrate birthdays and I am forever falling in love with new ways to "build" them on cards!  Today let's use Double Rose Ribbon White 1.5" and Beautiful Bling Borders-Fancy Waves! by Nina Brackett....


I tinted my rose ribbon using antique rose glimmer mist and glued a single rose strip to form the bottom layer of the "frosting" area.  I then added three more roses cut into individual pieces and layered to form the rounded top.  The bling border scallops are the perfect fit for the rose ribbon and provided that little something extra to the design. 


A real birthday candle tops the cupcake and a hand tinted half doily gives this card an unexpected pop of lime green.  I kept it simple with a kraft cardstock card base and kept the focus on the sweet details of this floral and bling confection!

Want2Scrap® Supplies Used:

Cross Promotional Products Used:

Other:
Stamps: Wilson Designs Stamps
Paper: October Afternoon and Papertrey Ink
Mist: Tattered Angels
Craft Supply: hand tinted doily, candle, ribbon, foam tape (3M)


My blog: Paper Daydream

Thursday, April 19, 2012

Live a Creative Life

Hi, y'all! Allie here to share a project with you.

I used new Canvas ATCs from the Donna Salazar line at Want2Scrap, and accented with some Black Gemstones and beautiful bling designed by Nina Brackett. Click on any of the photos to be taken directly to the store for purchase or additional details.
   

To create my ATC, I used by Copics ABS System to airbrush the background, and then I stamped a portion of a sentiment from a Suzi Blu Stamp (Stampavie) using ClearSnap Die ink. I then placed a Want2Scrap Silhouette on top of the image and sprayed it with a cool gray color. I held the silhouette down with two post it notes. This revealed the chandelier shape. I highlighted the shape with Smooch (also from ClearSnap) and turned to the back of the atc.
On the back, I used some foil tape and attached it to cardstock. I ran it through my die cut machine using the Flourish impressabilities embossing sheet from Spellbinders Paper Arts. I sprayed this with two shades of green, and then sanded off the top layer. I like to make sure the back of my ATCs are pretty.

Thank you for stopping by today to check out my project. Cheers to your creativity!


LinkWithin

Related Posts with Thumbnails
Pin It button on image hover