So sit back, grab a cup of joe, and enjoy the inspiration.
Today we are highlighting how versatile our baby bling line is! Did you know the smaller size was especially made with you in mind?? That’s right. We wanted you to be able to use these little beauties even in the tightest of spaces, fitting with any sentiment you may be using.
As you saw from the hop, there were quite a few unique examples for these adorable little embellishments and we have even more inspiration to share with you.
Please welcome guest designer Maggie Lamarre as she showcases an adorable idea for your gift card giving this year.
(By the way for the person on your list who’s crafty, we do offer gift certificates.)
~~~~~~~~~~~~~~~~~~~~~~~~~~~~~~~~~~~~~~~~~~~
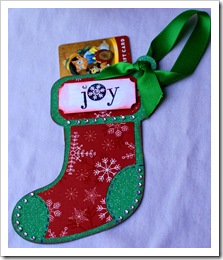
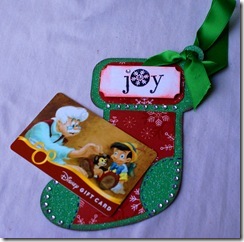
Joy Christmas Stocking by Maggie Lamarre


Supply list:
- Rhinestones from Want2Scrap
- Core’dination couture cardstock
- Imaginisce Christmas Cottage pattern paper
- Eksuccess/Inkadinakdo stamp, Eksuccess/Martha Stewart glitter pen, Eksuccess punch
- Glue dots International
- Staz-on Ink
- Colorbok fluid chalk
- Ribbon
- Cricut Machine
- Cut 2 stockings from Very Merry Tags Cartridge sizes 5.5” using Core’dination couture cardstock. Ink the edges and adhere both, leaving the opening on top to insert the GC.
- Cut the patch from Imaginisce Christmas Cottage pattern paper, ink the edges, and adhere to the stocking. Using the Martha Stewart pen, create faux stitching.
- Punch out a label from Eksuccess punch, ink the edges, stamp the word Joy, and adhere using a glue dot.
- Follow the edges of the stocking on both sides to create an arc with the silver rhinestones from Want2scrap.
- Add a row of bling right in between the label on top. Add ribbon and voila, you are done! A very simple yet adorable gift card holder.
Don’t forget about the two $25.00 gift certificate giveaway. Remember to leave as many comments as you wish and tell your friends about the blog hop. There is still time to participate!

See you on Friday!!


A bunch of these hanging on the tree would be really cute.
ReplyDeleteThis is adorable.
ReplyDeleteGreat gift card stocking!! Thanks for posting the cricut dimensions!!
ReplyDeleteWhat a cute idea!
ReplyDeleteThe stocking is adorable! TFS Susan
ReplyDeleteshanna13@frontiernet.net
I love this stocking. so cute.
ReplyDeletestuff@gt.rr.com
What a great card holder! Awesome job. Thanks for sharing.
ReplyDeletestacy at mycraftingtime dot com
Cute projects, thanks for the blog hop and blog candy.
ReplyDeletesyoung6987@aol.com
Cute projects. They'd look great hanging on the tree & to give away.
ReplyDeleteLove the little stockings, so cute!
ReplyDeleteCute stocking! Love all the bling! TFS!
ReplyDeleteHugs,
Joni
Arcocha@yahoo.com
oh, love anything sparkly. The bling on the stocking definitely made it more interesting!
ReplyDeleteThis is so cute:) I think it would be fun to see a lot of these on the tree:) TFS.
ReplyDelete~Madison www.funkycards.blogspot.com
These are soo cute!!
ReplyDeletei love to make gift card holders and the stocking is a fitting shape for one - wonderful!!!
ReplyDeleteWonderful stocking to hang on the tree AND use for gift cards!
ReplyDelete