Showing posts with label Sleek Strip Rhinestones. Show all posts

Thursday, April 12, 2018


Hello everyone, Terre Fry here with another quick and easy card you can create in 15 minutes or less, with the right products. Today I am using an Anna Griffin card kit, to kick it up a notch, I used 2 different Want2Scrap© bling products to enhance this already stunning card kit.


For this card I used the Sleek Strip 6" Black Rhinestones and the Nestabling Beaded Square Black Rhinestone to enhance this beautiful card. See just how easy it is to turn a pre-made card kit into something that is quick and easy but also stunning.
 Hope you like this simple card, make sure to check out all the beautiful bling here at Want2Scrap©

Crafty Smiles,

Friday, May 5, 2017

Chipboard Flaire

Hello Everyone, Terre here with a creative design using Want2Scrap© and W2S Dress Form.
I wanted to share this project with you so that you could see how fun and creative you could be when using these chipboard embellishments you find in the Want2Scrap© store.

Here is a picture of the dress form being in it's raw form
 
 
and here is a close up after I have die cut feathers out of Graphic 45
 Artisan Style 8 x 8 pad of pattern paper.
 
 
I added Sleek Strips 6" Rhinestone Black Bling and flowers with a touch of tulle. I painted the raw chipboard dress form using white acrylic paint, then lightly sanded it to give it a distressed look.
 
I hope you have been inspired to create one of your own dress forms or to use any of the other variety of raw chipboard embellishments we have here at Want2Scrap©.
 
Happy Crafting,
 
Terre
 

Tuesday, January 3, 2017

Under the Sea with Heartfelt Creations and Want2Scrap

Hello and welcome!  Susie here today with a quick all occasion card I created with a stamp from Heartfelt Creations and Want2Scrap bling!
I don't have a lot of patience for detailed coloring but that doesn't keep me from using a beautifully detailed stamp. The Under the Sea stamp set has 5 whimsical sea creatures with the most amazing details!
I created a wash of orange and yellow on watercolor paper with Color Burst and then I stamped and die cut some of the little fishies.

One of my favorite things about Heartfelt Creations stamps is that they frequently come with dies that match. It makes it quick and easy to isolate an image and then pop it up off the background for a huge impact.  Here I used dimensional adhesive to add one of the fish on top of an Ultramarine Blue Color Burst background.
I mounted that whole element on black cardstock and then lined the top and bottom with a strip of washi tape from my stash.  The final touch was a double layer of Sleek Strip Rhinestones in 2 colors and sizes - black and turquoise.

Want2Scrap Supplies for Under the Sea Card:

Cross Promotional Supplies:
Other supplies:  Ken Oliver Crafts Color Burst - Ultramarine Blue, Lemon Yellow, Orange; watercolor paper,cardstock, dimensional adhesive, ink, embossing powder, washi tape

 Thanks for stopping by and I hope you find some time to play today!  Susie

Wednesday, October 5, 2016

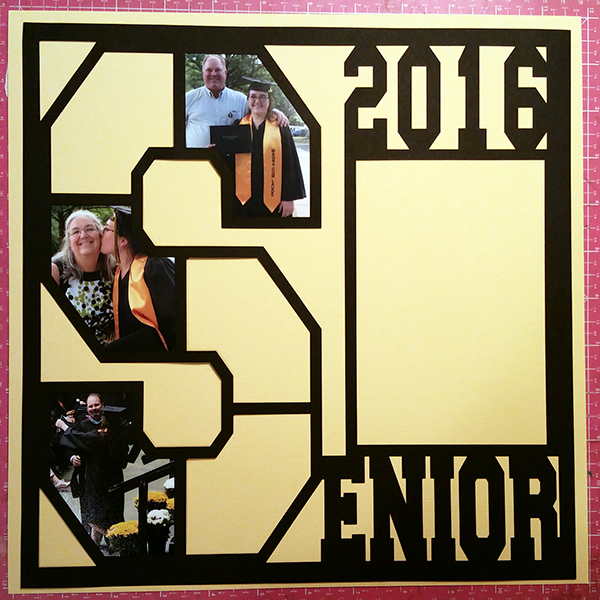
Senior Year Overlay

Susie here today and I am sharing a fun layout I created using the Want2Scrap Senior Year Overlay.

The overlay is designed so that there is a collage area all ready for your pictures.

I used the overlay as a guide to cut pictures to the right size and shape:.


I flipped it over and added 1/8" Double Sided "Tear-ific" Tape around the edges...

... and then pulled up the liner and adhered the photo.

I added the photos one at a time.  I had a lot of photos so I was able to completely fill in the collage.  If you don't have enough pics, you can fill in the open segments with coordinating patterned paper.

Then I  adhered the main photo and edged it with Sleek Strip 6" Rhinestones in black.
.
Here's a close up:

Thanks for stopping by and I hope you find some time to play today!  Susie

Want2Scrap Supplies for High School Senior Layout:

Cross Promotional Partner Products:
Other supplies:  cardstock

Wednesday, August 10, 2016

Happy Hour Selfies Overlay

People take selfies absolutely everywhere these days and the beauty of this overlay from Want2Scrap is that it is so easy to customize to any theme!  Susie here today and you can see here that with the right embellishments, it was perfect for my pictures from a girl's night out!


I started by trimming the overlay down to an 11.5" square and centering it on a cheerful polka dot background.  I love the laser cut title in this overlay but I felt I had to alter it just a tiny bit to reflect the silliness of our evening. You can see below that I added just a couple of words with my label maker and now it quite properly reads "No Selfie Control" as we amused ourselves by snapping selfies with our drinks!

Each window in the overlay is an opportunity for a little fun!  I used Sleek Strip Irridescent Rhinestones across the top of this opening and then I just started to play with embellishments from my stash.

Here I used the Red Sleek Strip Rhinestones and, when paired with the little arrow stickers,  they really help to move the eye around the layout.

These cocktail stickers were perfect for my theme and helped me use up some of my stash!

The 3 large openings were filled with our selfies and embellished with stickers and chipboard pieces.

So what kind of selfies do you have to scrap?  Pics from the beach?  A birthday party? A sporting event?  Let's get them out of the camera and onto a page!

Thanks for stopping by and I hope you find some time to play today!  Susie

Want2Scrap Supplies for Selfie Overlay Layout:

Other Supplies:
  • MAMBI Chips - Chipboard Stickers - Insta Love
  • MAMBI The Happy Planner Stickers - Everyday Reminders
  • MAMBI Sticks - Cocktails
  • Momenta Puffy Word Sticker - Sassy Girls Night Out
  • Momenta - Friendship Fetti Mini Epoxy Stickers
  • Paper House Productions - Handmade 12" Paper Pad

Wednesday, July 27, 2016

Got My Learner's Permit!

Susie here today with a layout that celebrates the day my daughter got her learner's permit! Teaching my daughter to drive was a little stressful and a lot of fun...or maybe it was a little fun and a lot of stress?!  Either way, I took the time to snap some photos along the way.  I took pictures of everything - from the ticket she pulled at the DMV to the vision test to the moment she finally got behind the wheel!  When I was ready to scrap it I was so excited to find that Want2Scrap had the perfect 12x12 overlay!
I started by trimming the overlay to an 11.75" square and centering it on some green paper/cardstock.

One of my favorite things about using overlays from Want2Scrap is that they come with built in title areas.  The laser cut area for this overlay is in the bottom right corner.  Don't you just love the car key?
Strips of washi tape embellished with more of the Sleek Strip Purple Rhinestones are a simple and pretty accent I used all across the layout.
The overlays come with white backing paper that create a frame inside of each opening.  I actually used the white edge to do some simple journaling.  (She was fearless, but mom was a little nervous!)
 
Overlays provide a clean background that make it easy to incorporate lots of fun embellishments:  washi tape, stickers and custom labels!  Here are close ups on the last few openings...


Want2Scrap Supplies for Got My Learner's Permit Layout:

Other:
  • Paper House Productions 3D and Puffy stickers
  • MAMBI Planner Stickers
  • Little Yellow Bicycle washi tape stickers
  • Dymo label maker

Thanks for stopping by and I hope you find some time to play today!  Susie


LinkWithin

Related Posts with Thumbnails
Pin It button on image hover