Saturday, April 30, 2011

Meet our Guest Designer...Julie Tucker-Wolek!

May is here and it is time to meet our new guest designer...Julie Tucker-Wolek. Julie is a total sweetie, wonderfully talented and we are so please she could join us this month! Welcome Julie!


This is what Julie told us about herself...My name is Julie Tucker-Wolek, and out in the cyber world, I am known as the SMILEY girl as I leave a lot of SMILES everywhere I visit! :):):):):):):):):):) I have been scrapbooking for almost 14 years when my son was born, but really
got 'serious' about 4 years ago! :) I don't really think I have a style, I can
be clean and simple, to all over the place, I feel that my style is ever
changing, and I am okay with that as I am never afraid to try new things!
:):):):):):):):)

Now check out these sneaks Julie shared with us...


Talk about eye candy! Love this other sneak using Nikki Sivils, Scrapbooker.


Thanks so much for joining us Julie, we can not wait to be inspired by you! Check back all month to see more of Julie's work!

National Scrapbook Day is next Saturday May 7th...come celebrate with us and you just may win some fabulous Want2Scrap Goodies ! See you then!


Friday, April 29, 2011

Bling Is A Girls Best Friend!

Good morning blogging friends! It seems like once Spring rolls around the wedding bells start ringing so I thought I would get a head start on wedding cards and I have one to share with you today. I think I am in love with the Black Rhinestone Nestabling™!! How gorgeous is that? I know sometimes people are afraid to use the color black in their card designs, afraid it might make the card too dark but I think using black for accents gives it just the right touch of richness and elegance. I used Nestabling™ Beaded Square Black Rhinestone, Nestabling™ Fancy Tags Two Black Rhinestone and Silver Baby Bling on the wedding card. The beautiful designer paper is from Graphic 45 Le' Romantique Collection.To start I wanted to do the Reverse Stencil Technique on the S4-315 Beaded Squares die template from Spellbinders™. I used Black Color Box Chalk Ink and inked directly on the inside of the die template and then used the Grand Calibur™ to cut/emboss.Next I used a stamp from the Faith stamp set from JustRite Stampers, Tuxedo Black ink and stamped the sentiment on to Simply Smooth Ivory cardstock. I used S5-030 Fancy Tags Two and the Grand Calibur™ to cut/emboss the tag.Before removing the cardstock from S4-315 Beaded Squares I used the die template as a stencil and inked the diecut with Antique Linen Distress Ink. The black edging on the diecut is the results from the Reverse Stenciling Technique. For the image of the Groom and Bride I used S4-126 Classic Squares Large #6 to cut/emboss the square. I also used the die template as a stencil for the tag and inked the inside edges with Antique Linen.I used Nestabling™ Beaded Square Black Rhinestone to edge the diecut. Next I tried something a little different--I very carefully used a heat tool on the exposed adhesive part on the Nestabling™ and it created a wavy ribbon look to the adhesive and made it tacky to apply and hold glitter. Here is a close up. I think it's kind of neat looking and it adds just a little more texture and dimension. I used Autumn Medley Glitter from Sparkle N Sprinkle. Now, if you are going to try this please be very careful and don't hold the heat tool on the adhesive part for too long or it will melt. It only takes a few seconds to get this effect. Here is a close up of the finished piece. I also added one little Silver Baby Bling for the ring. ;-)
Next I added Nestabling™ Fancy Tags Two Black Rhinestone and a couple Silver Baby Bling to the tag and then I added some of the same glitter as mentioned above.Here is a close up of the tag.
I didn't have any ribbon to match the Graphic 45 paper so I hand tinted and crinkled some seam binding using three shades of Glimmer Mist from Tattered Angels. To adhere the diecut and the bow I used 3-in1 Advanced Craft Glue from Beacon Adhesives.Here is a close up of the bow and the Trinket Pins from Maya Road.Thanks so much for stopping by the Want2Scrap™ Blog today!! I hope you have a creative day!!

Hugs,

Want2Scrap
Supplies Used:

Nestabling™ Beaded Square Black Rhinestone
Nestabling™ Fancy Tags Two Black Rhinestone
Silver Baby Bling

Other Supplies:
Stamps: JustRite Stampers Cling CL-02130 Faith
Paper: Graphic 45 Le' Romantique Collection; Discount Cardstock Simply Smooth Ivory
Ink: Clearsnap Color Box Chalk Black; Tuskineko Memento Tuxedo Black; Ranger Antique Linen Distress Ink
Dies: SpellbindersGrand Calibur™, S4-315 Beaded Squares, S4-126 Classic Squares LargeS5-030 Fancy Tags Two
Accessories: Sparkle N Sprinkle Autumn Medley Glitter; Hug Snug Seam Binding; Tattered Angels Tutti Fruitti, Tiger Lily, Suede Glimmer Mist; Maya Road Trinket Pins; Beacon Adhesives™ 3-in-1 Advanced Craft Glue™; Scrapbook Adhesives by 3L™ 3 D Foam Squares; Heat Tool

Thursday, April 28, 2011

Happy Birthday....Nestabling

The Nestabling has arrived in the store HERE and it is ready to be used on your fabulous projects. Just look what I have here. I am in need of sooo many birthday cards this month. I have 3 co workers and several blog friends who's birthdays are this month. So I decided to pull out my pretty Nestabling Beaded Square White Pearls and frame a soft feminine flower. Perfect!


I also added some White Baby Pearls to my tag to dress it up a little. Do you see this pretty Graphic 45 Le Romanitque paper? They were so nice to sponsor the design team here at Want 2 Scrap. I love the vintage feel with a little added grunge.


Here is how I put together my center focal point. I cut out my square using Spellbinders Nestabilities Classic Squares Large.


I then took my craft tweezers and pulled off the Nestabling Pearls so I don't put my fingerprints all over the adhesive.


Then adhear them to the paper. You can add your favorite colored image, or pretty flowers, the possibilites are endless.


Want 2 Scrap products used:

White Baby Pearls
Nestabling Beaded Square White Pearls

Thanks so much for stopping by,
Heather


I just wanted to add a little note that Heather's area was hit by tornadoes this week. She is okay but please keep her and others in her area in your thoughts!


Tuesday, April 26, 2011

Bling Out Some Summer Memories!


Although spring is still taking it's T-I-M-E to arrive in many parts of the
country, I'm setting my sights on a sparkly summer.... VERY sparkly!

Yes, friends! My new arsenal of NESTABLING and many other fabulous
Want2Scrap products are littered across my desk top, beckoning inspiration
and glittering with just the right amount of light to remind me that summer
will be here soon! In fact, to get me REALLY thinking summer, I decided
to BLING out some old memories, and dress them up, Want2Scrap style!


I "cross pollinated" this dazzling menagerie of summer memories, with hope for
the coming season and with bling from all sections of the Want2Scrap store!
We'll just call it the perfect storm of bling... {How BOUT that!}


Stealing the show, as my centerpiece, check out the brilliance of the
Nestabling, Petite Scallop Circle in Turquoise, paired with
small silver baby bling, along the edge of this terrific accent from Nikki Sivils {!}
from her wonderful line of paper, Summer! {Did I get down and dirty with
THIS fabby collection!?! Meow!} Doesn't the circular line of Nestabling
make your heart skip a beat or TWO!?!
From the petite and regular size circles, there's something to fit your every
blingy need! I hope you've considered ordering in MULTIPLES!
{Seriously, let me HELP you need more BLING! Lol!}
I'm simply dizzy from the brilliance of the bling in this project!


So, of course - said to myself: NEED MORE BLING!


More BLING + more DIZZY... Dizzy = GOOD... Good makes me HAPPY...
Happy makes me more CRAFTY! Crafty makes me ... WANT MORE BLING!


An old photo that was leftover from a page scrapped long ago, has now
found it's brilliant home with A LOT of Want2Scrap bling and a happy
curio created with an old embellishment box and a lot of LOVE and
great materials! What a fun way to be thinking SUMMER!


I hope you're inspired to BLING OUT some summer memories, too! Enjoy!


Want2Scrap Supplies Used:

Nestabling, Petite Scallop Circle - Turquoise

Silver Baby Bling
Turquoise Rhinestones

Silver Rhinestones

Sunday, April 24, 2011

Happy Easter, Happy Spring!

I want start off wishing everyone a wonderful Holiday! Enjoy the day!

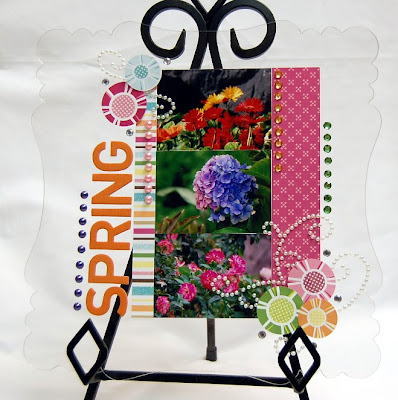
I also wanted to share this fun Want2Scrap project with you. I have made these awesome acrylic sheets before. I have already created one of these for both winter and summer...but it is time for spring so I pulled out my scraps and decide to create away...oh yeah, you will see one of these in the fall too. That is the only season that I don't have one for yet!

I used six types of bling on this...gotta love me some bling! Pink Pearls, White Pearl Swirls, Amber Rhinestones, Silver Rhinestones, Lavender Pearls, and Green Rhinestones.


I love how just a few scraps of colorful paper mixed with tons of bling makes this just perfect! Check out these fab swirls!


In the next few weeks you will be seeing all kinds of fun new goodies! Want2Scrap, Nikki Sivils, Scrapbooker, Graphic 45, and PSA Essentials, Beacon Adhesives have all been extremely generous with our design team and I just wanted to say a very big Thank You to them all.


I hope everyone enjoys their sweet day!

Hugs!


Want2Scrap Products used:
12x12 Acrylic Sheet - Style C
Pink Pearls
Lavender Pearls
Green Rhinestones
Silver Rhinestones
Green Rhinestones
White Pearl Swirls

Friday, April 22, 2011

Our Family Acrylic Album

Hello everyone, Today I have one more round album, this time I use the Circle Acrylic album I wanted to create something with Spring colors/textures in mind, also a few of my favorite embellishments like: ribbon, flowers, glitter, buttons etc...

Love this album because it has that soft feel that I like so much, I adhere lots of embellishments on the cover: chipboard, lace, buttons, flowers, mini wooden house, adhesive pealrs ...


the inside pages are covered in paper but I left some spaces "free" to see/show the Acrylic.


I love how the rub ons look when you apply them on the "free" spaces


Our Family Acrylic Album:


I hope I have inspired you to use some of the beautiful products from Want2scrap, thanks for stop by and have a great day!!! :)


Wednesday, April 20, 2011

Blinged out Bookmark

Hey everyone! It's Melissa here and I wanted to share a different way to use your bling, aside from on paper! I was recently inspired by some bookmarks I recently found in a Country Living magazine and wanted to create my own, with, of course, some handy dandy bling. :)


So I have an excess stash of these little acrylic tags and thought I could stamp a sentiment right behind them on some patterned paper for a pretty focal point to my bookmark. The bling from Want 2 Scrap adhered soooo beautifully right to the top of the acrylic, and let me tell you, they are not budging!


So pretty right?? :)

It may be painfully obvious how we apply our bling to items, but I just wanted to share a bit of the method to my madness. :)


First off, a picture of the bling I used, a package of the Pink Rhinestones, Silver Rhinestones, and my already finished tag ready for embellishing.

And as you can see here, I never even touch the bling with my fingers at all. I use a "Quicker Poker Picker Upper" by QuicKutz to pick up my bling off from the adhered sheet and then apply it directly to my desired location. I like to do this, first off, so I don't get the adhesive untacked from any dirt or crafty sediment already attached to my fingers :) and so that that adhesive stays perfectly intact to the bling. Works just perfectly!


And voila, you are all done! Thanks so much for stopping by and I hope you enjoyed this little bit of information. :) Remember, you can always add bling to your 3d projects for added sparkle!

Sunday, April 17, 2011

Taking bling to a new level for Mom

There is no question Want2Scrap has brought bling to a whole new level with the recent pairing of Nestabling and Spellbinders dies.  Today, I am going to take our bling line to a whole new level, literally, by going UP.....see that flower center above?  It's not your dear granny's diamond earring, nope, it's not!  Although, I was inspired by some vintage jewelry pieces when constructing this bling-y centerpiece.
Want2Scrap's self adhesive bling sticks to so many surfaces...including itself!  I started building my centerpiece right on the transparency sheet the silver bling came packaged on.
Using the package liner sheet, I built my bling centerpiece with two stacked large bling and seven medium sized bling.  I also die cut, painted and distressed a piece of chipboard to serve as my centerpiece backer.  The finished piece fits nicely into the crepe streamer flower I made.

Great dimension and 3-D effect right?  Much prettier than a piece of dimensional foam peeking out from the center I think.

All that was left was to adhere my hand-crafted flower to my card that also showcases Want2Scrap baby bling and Nestabling petite scalloped circle small in lavendar pearl! A little something special for Mom is born!

Thanks for stopping by today!

Supplies:
Bling from Want 2 Scrap:


LinkWithin

Related Posts with Thumbnails
Pin It button on image hover