Showing posts with label techniques. Show all posts

Thursday, April 26, 2012

Seaside Friends by Joe Morgan

For my artist trading card, I wanted to create this under sea scene after getting some inspiration from a piece of Robin’s Nest paper that reminded me of ocean waves.

I started off with one of Want2Scrap’s Chipboard ATC’s. I love the weight of these and they are nice and thick so they don’t bend when you put glue or paint on them. I covered the ATC with Zip Dry adhesive to adhere my piece of Robin’s Nest paper. I wanted my background to be glossy, but not as glossy as the mermaid, so I covered the Robin’s Nest paper with PPA Gloss which gives a nice glossy, but satin like finish depending on how you apply it. After that, I inked the edges with a Charcoal Cat’s Eye ink pad from Clearsnap.

For the mermaid, I used a Stampendous cling stamp, and colored with Copic markers. Then I cut out the mermaid and covered her with Sakura Crystal Lacquerand set aside to dry. If you’re wondering, the seahorse is part of the mermaid stamp.

For the word Friends, I used Want2Scrap’s Chipboard Sentiments – Words of Love. First, I covered the word with pearl colored acrylic paint, and then used alcohol inks to add color, and then a light coat of clear crackle paint to finish it off. I also used the same colors of alcohol ink to dab a little matching color on the bottom part of my ATC to make my ocean floor.

After all of my pieces were ready, I used some more Crystal Lacquer to adhere the mermaid the the ATC, and then the word friends on top of the mermaid.

To finish my ATC, I used bling from two different packs of Want2Scrap bling. I used Maxxi Girl Swirls in Brown and the Finesse Swirls in the new LeCreme Pearls color. The mermaid stamp showed her with a braid or string tied around her hair with seashells on it. I covered that with the brown rhinestones and some of the LeCreme Pearls. I just cut off what I needed and placed them one at a time. I also put some down in the sand as well as a couple of large swirls to show the movement of the water. I just happen to love mermaids and seahorses, so I had a great time making this.

Tuesday, December 20, 2011

How to make a Want2Scrap-fabulous headband!


Have you been over to visit the Ribbon department at Want2Scrap lately?  Oh my stars, but it is bursting at the seams with new gorgeous product including......*drumroll*....rose ribbon!


Will you just LOOK at the amazing array of colors and sizes in my last order?  I adore these romantic and elegant fabric roses and while I am looking forward to adding them to my papercrafting projects I truly couldn't resist trying my hand at a homemade fashion accessory using a simple headband and the Larger Purple Rose 3" from Want2Scrap.


The three inch size makes quite an impact and a single blossom fills the palm of my hand.  Above you can see the "backside" of the rose on the left (which is quite pretty sewn to coordinating mesh fabric) and on the right is the "topside".  I love the variegated shades throughout the rose...no two look the same.


I gathered up an inexpensive plastic headband, one full and one half piece of the Larger Purple Rose 3" plus a gorgeous Ribbon Slides - Circle from Want2Scrap (have you seen THESE?!, oh be sure to check check all the different shapes of ribbon slides), a piece of black maribou craft feather boa and a small black and white striped ribbon scrap.


I used my go to multi-media embellishment glue, Fabri-tac from Beacon Adhesives.  Love this stuff!  Once you have your pieces gathered, just layer them onto the flower using Fabri-tac.


I gathered the half rose piece so that the ends touched and made a smaller looped flower to top the maribou feathers and then the final layer of the striped ribbon and ribbon slide topped off the piece.


Once the rose has been layered, I applied a generous line of Fabri-tac to the headband itself.


I was able to negotiate a live model for my project for the price of....what else?....
one Want2Scrap-fabulous headband!


This headband was a cinch to put together and would make a great gift too!


I adore the dimension the fabric rose provides to the project while still being lightweight, elegant and fun to combine with bits and pieces of craft items to make one of a kind accessories! 


From the bottom side, you can see that the rose ensemble doesn't interfere with the teeth on the headband.  I can't wait to make more of these and I also think my girls would love making their own!


She likes it!  She really really likes it!  ...and I'm pretty sure I was making it for her anyway *wink*!

So what do you think?  Are you ready to try making your own accessories with Want2Scrap fabric flowers? I would love to see what you come up with!


Want2Scrap™ Materials Used:

Cross Promotional Product Used:

Additional Product Used:
Ribbon
maribou feather boa
plastic headband

Sunday, September 25, 2011

Wedding Card

Hi there today I wanted to share another card with you using Want2Scrap's™ Nestabling™ and Nestaboard™. This card is simple, but sweet and for a very good friend of our's that's getting married soon. Even thought it looks simple, I pre-paired another quick tutorial showing you a few things on this card that I use all the time. Enjoy :)


Thanks for watching - Linda :)


Supplies Used:

Want2Scrap™

Nestabling™ Labels Fourteen Silver Rhinestones

Nestaboard™ Labels Fourteen.


Cross Promotional Products Used:

Spellbinders™: Grand Rectangles #3, Grand Large Labels #4, Labels Fourteen #2, Rose Creations, Floral and Stone, Foliage and Grand Calibur.


Other Supplies Used:

Cardstock: Whisper White – Stampin’ Up!

Copic Markers: 0 Colorless Blender, R00 Pinkish White, R20 Blush - eclectic Paperie.

Misc.: Silver Cord, Maya Road Vintage Paper Poisies. Crafty Secrets Wonderland Tea Creative Scraps image. Pergamano Embossing Mat and tools.


Sunday, July 10, 2011

Want2Scrap™ Inchies and CHA Sneak #3!!!

Welcome to Day #3 of the Want2Scrap’s CHA product sneak peeks! Isn’t this fun??!!! 
If you missed Day#1 sneaks or Day#2 sneaks, please click the links so you don’t miss out on all the exciting releases. Remember to comment, follow the blog, or like us on Facebook for an entry to win the Grand Prize and other fine prizes!!
Our first sneak is:
sneak-image7
The Nestaboard Labels Twenty-Two set is BRAND NEW from Spellbinders and they just snuck a peak over on their blog frenzy!  Our Nestaboard™ coordinates with the NEW Spellbinders Die S4-346 and the Nestabling™ Labels Twenty-Two that will be brand new at CHA Chicago!!
and if that’s not all . . we have another BRAND NEW release to share:
sneak-image8
I’m so excited about this one. It might just be one of my favorite shapes!  This Nestaboard™ coordinates with Spellbinders Die S4-347 and the new product Nestabling™ Labels Twenty-Three debuting at CHA Chicago! 
Can you stand to see more?  Well we have one more for you!
sneak-image9
Yes the Nested Pennants shape!!  This coordinates with the Spellbinders Die S5-028 and the Nestabling™ Nested Pennants currently in the store. Take your pennant creation to new heights with our brand new Nestaboard™!!
We hope you’ve enjoyed today’s sneak peak.  Don’t forget about our contest going on!  Here the rules:
How would you like to be the first to play with this NEW product?? Well it’s simple. You could be the first to receive a prize package containing these wonderful products! Every day you participate and leave comments, you’ll be entered to win one of three great prizes . . . one of which will be a Grand Prize but you will have to keep checking back to see what the Grand Prize is since we are still revealing products!!
To be eligible simply:
  1. Leave a comment and follow the blog.
  2. Like us on Facebook.
  3. Tell your friends about the product.
What could be easier? You can do one or them all. If you do more and comment each day, you’ll get more entries!
Also keep an eye out on our Facebook page as we will be having some fun surprise giveaways during our Sneak Peek Week!
-----------------------------------------------------------
Introducing Want2Scrap™ Inchies
Acrylic is one of my favorite products to work with. I love the versatility of it...now Want2Scrap™ has made their own Inchies...of course I started to play as soon as I got my goodies!

I used so many Want2Scrap™ products on this layout. Nestabling™ Petite Scalloped Circle , Inchies, Sage Green Pearls,
Baby Bling - Le Creme Pearls , Baby Bling Rhinestones - Turquoise, Baby Bling Rhinestones - BlueGreen, Dark Green Rhinestones - 72 Count, Rhinestone Ribbon Slides, and a Light Blue 1" Butterfly. I took this photo of my little guy Jack just a week ago and I wanted to scrap it as soon as I printed it. So sweet!


Don't you love these new Inchies! I used rub-ons on them, then added some bling. They are the perfect size for punches or stamps too.


On this one I added this Rhinestone Ribbon Slides...it was an ribbon slide but I cut out the center piece and just kept it as a heart.


The Nestabling™ Petite Scalloped Circle is always perfect around a die cut. Thanks so much for stopping by...be sure to keep an eye our for more Want2Scrap™ Sneak Peeks!


Want2Scrap™ Products:
Light Blue 1" Butterfly
Rhinestone Ribbon Slides
Nestabling™ Petite Scalloped Circle
Sage Green Pearls
Baby Bling - Le Creme Pearls
Baby Bling Rhinestones - Turquoise
Baby Bling Rhinestones - BlueGreen
Dark Green Rhinestones - 72 Count
Inchies - Not yet listed in the store

Cross Promotional Products:
Beacon Adhesives 3 in 1 Advanced Craft Glue

Other Products:
Pattern Paper- Best Creations, Prima Marketing Inc, Studio Calico, MME
Run-ons- Pink Paislee, October Afternoon, Crate Paper, Fancy Pants, Hambly
Flower- Prima Marketing Inc.
Alphabet- American Crafts
Trim- Maya Road
Punches- Martha Stewart

Saturday, July 2, 2011

Altered "Retro" Chipboard Album


Hello and thank you for joining us for our very first Nestabling™ week! Designers from both Scrap-Mart.com and Want2Scrap™ have teamed up to bring you a week long mini blog hop full of beautiful projects featuring Nestabling™ by Want2Scrap™. If you are just joining us, hop on over to the Scrap-Mart Blog and start there. Before we get started with the projects, we’d like to send a special thanks to Want2Scrap™ for their generous donation of Nestabling™ for our designers to work with.

Please check out the fantastic project by Eva posted on the Scrap-Mart Blog and Elise's blog from Want2Scrap™ today.

Thanks so much for stopping by today and I hope you enjoy the blog hop!!

Hugs,

Now check out this amazing album by Dana!

Hey friends! I'm excited to share a sweet altered chipboard album with you today.


So much amazing detail...


I used the Retro chipboard album from Want2Scrap™. This style of album also comes in acrylic to maximize your creative opportunities.


One of the most interesting features of this particular album for me was the fact that the pages cascaded and also had some cutout designs that I could use to highlight little bits like the sweet fairy and chick above.


For a cascading page album, it's all about the edges that hang out for me. I kept my embellishments to the edges that would show and left the rest of the book page fairly open with minimal elements added outside of designer papers.


Using a paper pad like this one from Graphic 45 helped ensure a cohesive look throughout the whole album. I also decided to use white pearl and silver bling embellishments from Want2Scrap™ throughout the album, again to give that cohesive look I was going for.


Aren't these sheer flowers from Want2Scrap™ just delicious? They come blinged up with the same high quality bling that is used in the bling swirls and individual pieces.


Adding additional chipboard pieces either cut using your die cutting system or the beautifully ornate chipboard shapes from Want2Scrap™ is a snap with a strong liquid craft glue.


This flourish was painted, stamped, glittered and misted (whew!) before I added just a bit of silver bling to create an interesting corner on one of the book's pages.


Simple additions of interesting trims to book edges are a fun way to embellish those back pages that are patiently waiting their turn for some pretties. This piece of ribbon came in a mixed pack from Want2Scrap™ (more coming soon!)


The final pieces to this mini album puzzle are a pretty back cover and


flowing iridescent ribbons to hang from the top snap ring binder. Now if you have never or rarely tackle a mini book project you might want a few tips for the journey. The following may be helpful to you and then you'll be cranking out minis like there is no tomorrow!


To start with, I made the happy discovery that the Retro album had the perfect height dimension for my 8x8 paper pad! That means less cutting and I like that!


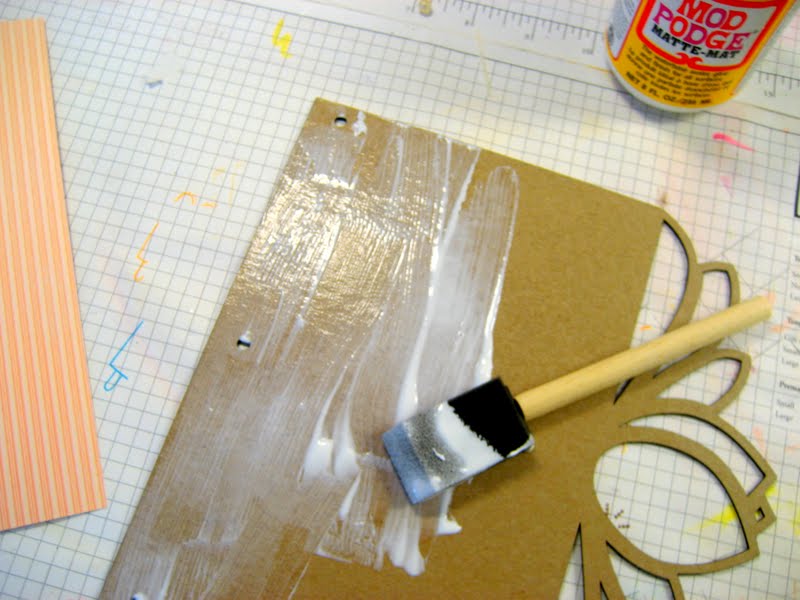
Making your designer papers one with the chipboard is an easy task. I am a fan of Mod Podge glue for this. I spread an even layer of glue with a foam brush over the whole surface of the chipboard page base. Don't forget the ornate parts. The designer paper is simply laid down upon the glue and left to dry after smoothing down any air bubbles. A rubber brayer helps with this task.


Once the glue dries (NOT when it's wet like I did above!) use a sharp craft knife to cut away papers from the edge detailing.


On the very back pages of the retro album, the 8x8 paper runs a little bit short. No worries! This is an opportunity to break out some paper punches to make a scalloped edge in a contrasting paper to cover the remaining chipboard.


Finishing off those edges, especially the detailed ones, may call for the use of a file to rub away any rough edges. I also chose to run an edge of white acrylic paint along my album edges as you can see above.


Once all of the pages have been covered in paper, sanded and painted let then REALLY dry in a stack with a meaty book to way them down. I let mine dry overnight and by morning they were ready for the next steps. Embellishing!


I like to start making my embellishment decisions without making the commitment of sticking them down to begin with. Out comes my trusty clips to help me hold eligible embellies temporarily in their place so I can get a look of what things will look like when viewed together from the top. Once I have things where I like them, it's time to start adhering everything.


For this Want2Scrap™ sheer butterfly beauty I turned her light pink coloring to more of a pinky peach with a quick spray of Suede glimmer mist.


Final touches like this gathering of flowing iridescent ribbons add to the fairy charm of this sweet book. A simple knot of them on the top binder ring makes a fun adornment.

Whew! Are you still with me? That was a plethora of pictures but I hope it gave you the opportunity to get inside the foundation of this album. It's now happily sitting on my desk, bling winking in the morning sun as I type this, waiting for the right photos and stories to come along to nestle among it's pages. Now if you know me, you'll probably assume it's photos of my sweet little girls...and I'm guessing you are right! Have a beautiful day, friends!


Want2Scrap™ Supplies:

Cross Promotional Supplies:

Other Supplies:
Mod Podge
Ranger Stickles
Acrylic paint (white)
Tattered Angels Glimmer Mist
Stampin Up! Stamps, scallop punch and Ink
Martha Stewart glitter

Friday, April 29, 2011

Bling Is A Girls Best Friend!

Good morning blogging friends! It seems like once Spring rolls around the wedding bells start ringing so I thought I would get a head start on wedding cards and I have one to share with you today. I think I am in love with the Black Rhinestone Nestabling™!! How gorgeous is that? I know sometimes people are afraid to use the color black in their card designs, afraid it might make the card too dark but I think using black for accents gives it just the right touch of richness and elegance. I used Nestabling™ Beaded Square Black Rhinestone, Nestabling™ Fancy Tags Two Black Rhinestone and Silver Baby Bling on the wedding card. The beautiful designer paper is from Graphic 45 Le' Romantique Collection.To start I wanted to do the Reverse Stencil Technique on the S4-315 Beaded Squares die template from Spellbinders™. I used Black Color Box Chalk Ink and inked directly on the inside of the die template and then used the Grand Calibur™ to cut/emboss.Next I used a stamp from the Faith stamp set from JustRite Stampers, Tuxedo Black ink and stamped the sentiment on to Simply Smooth Ivory cardstock. I used S5-030 Fancy Tags Two and the Grand Calibur™ to cut/emboss the tag.Before removing the cardstock from S4-315 Beaded Squares I used the die template as a stencil and inked the diecut with Antique Linen Distress Ink. The black edging on the diecut is the results from the Reverse Stenciling Technique. For the image of the Groom and Bride I used S4-126 Classic Squares Large #6 to cut/emboss the square. I also used the die template as a stencil for the tag and inked the inside edges with Antique Linen.I used Nestabling™ Beaded Square Black Rhinestone to edge the diecut. Next I tried something a little different--I very carefully used a heat tool on the exposed adhesive part on the Nestabling™ and it created a wavy ribbon look to the adhesive and made it tacky to apply and hold glitter. Here is a close up. I think it's kind of neat looking and it adds just a little more texture and dimension. I used Autumn Medley Glitter from Sparkle N Sprinkle. Now, if you are going to try this please be very careful and don't hold the heat tool on the adhesive part for too long or it will melt. It only takes a few seconds to get this effect. Here is a close up of the finished piece. I also added one little Silver Baby Bling for the ring. ;-)
Next I added Nestabling™ Fancy Tags Two Black Rhinestone and a couple Silver Baby Bling to the tag and then I added some of the same glitter as mentioned above.Here is a close up of the tag.
I didn't have any ribbon to match the Graphic 45 paper so I hand tinted and crinkled some seam binding using three shades of Glimmer Mist from Tattered Angels. To adhere the diecut and the bow I used 3-in1 Advanced Craft Glue from Beacon Adhesives.Here is a close up of the bow and the Trinket Pins from Maya Road.Thanks so much for stopping by the Want2Scrap™ Blog today!! I hope you have a creative day!!

Hugs,

Want2Scrap
™ Supplies Used:

Nestabling™ Beaded Square Black Rhinestone
Nestabling™ Fancy Tags Two Black Rhinestone
Silver Baby Bling

Other Supplies:
Stamps: JustRite Stampers Cling CL-02130 Faith
Paper: Graphic 45 Le' Romantique Collection; Discount Cardstock Simply Smooth Ivory
Ink: Clearsnap Color Box Chalk Black; Tuskineko Memento Tuxedo Black; Ranger Antique Linen Distress Ink
Dies: Spellbinders™ Grand Calibur™, S4-315 Beaded Squares, S4-126 Classic Squares LargeS5-030 Fancy Tags Two
Accessories: Sparkle N Sprinkle Autumn Medley Glitter; Hug Snug Seam Binding; Tattered Angels Tutti Fruitti, Tiger Lily, Suede Glimmer Mist; Maya Road Trinket Pins; Beacon Adhesives™ 3-in-1 Advanced Craft Glue™; Scrapbook Adhesives by 3L™ 3 D Foam Squares; Heat Tool

LinkWithin

Related Posts with Thumbnails
Pin It button on image hover