Tuesday, December 18, 2012

Clean and Simple: Noel


Here's a fun Clean and Simple Card, also known as a"CAS"card.

The card was cut and scored. 
It's a simple card base, 4.25x5.5" folded vertically, rather than horizontally.

The patterned paper mat measures 4x5.25" and was lightly edged with a BG49 Copic Marker.
The word "NOEL" was created on the Cricut, and just the outline is used, rather than the letters.
Noel was attached with 3D Foam Tape and embellished with Turquoise Baby Bling.
The "O" is decorated with a Blank Craft Shape embellished with more Turquoise Baby Bling.

Some Snowflake brads and a swirl and leaf bling 
from Donna Salazar's 
were added to complete the card.


Products Used


Donna Salazar's Build Your Own Bling, Want2Scrap [shown]

Additional Products Used

Paper - October Afternoon
Cardstock - Neenah Solar White Classic Crest
Snowflake Brads - Creative Impressions
Other - BG49 Copic Marker

Adhesives Used

3D Foam Tape, Close To My Heart
Tombow Adhesive, Close To My Heart
note - Tombow Adhesive refills available here.

Links to purchase most of these products are made available. 
If you have any questions about this project, or any of the products used, 
please contact Want2Scrap via e-mail or through the comments. 

Please ... like Want2Scrap on FaceBook. 

Thank you for visiting.
Come back soon.


Monday, December 17, 2012

Tis the Season for a Snowman Canvas...


I love to make art canvases. I never thought I would. I always though you had to be an "artist" to make a canvas but classes by the amazing Christy Tomlinson taught me that anyone can be an artist. With the holiday soon upon us I decided to make a snowman canvas that I could display longer than a holiday specific canvas.


The trees are just so easy to make, by cutting a triangle for the tree and a small rectangle for the stump...simple as that. Adding a few details with rub-ons and pens make them so dimensional. 


I am seriously so in love with the Christmas Bling by Nina Brackett. There are two varieties to choose from and you can't go wrong. 


Want2Scrap also has some great new Winter Releases. I love the fun chipboard words. I used the word Blessed. I painted on Gesso and then spray ink. I then added a layer of Sakura Chrystal Lacquer. It holds everything and is perfect for holding crushed glass. Last but not least a few strips of my favorite new product, Nina Brackett's Chevron Bling. Love it!


I hope you all have a Blessed Holiday!

Want2Scrap  Products:

Find all this BLING and more at Want2Scrap.
Our HOLIDAY SALE continues...
EVERYTHING is 40% off!

Cross Promotional Partners:

Other Products:
Paint, Gesso - Liquitex
Stamps - Christy Tomlinson for Unity Stamps
Ink - Staz On
Markers - Faber-Castell
Pen - Scarlet Lime
Corigated Cardboard Branches - Maya Road
Mistable Trees - Studio Calico
Decopage - Plaid
Rub-ons - Kaiser Craft, Basic Gray, 7 Gypsies, Black River Designs
Pattern Paper - My Minds Eye, Studio Calico, Lily Bee Designs,  Stash


Sunday, December 16, 2012

Holy Season

Hello, AJ here sharing another Christmas card using Want2Scrap's bling. 


Since the holidays are quickly upon us, this is a quick and easy card.  A quick way to send off some homemade holiday cheer is to use up patterned paper and stamps.  I stamped my sentiment onto the oval die cut, and added some Baby Bling Rhinestones in Red to set it off.  I finished the card off with the Swirls Finesse in Black.

Want2Scrap Products Used:
Baby Bling Rhinestones in Red
Swirls Finesse in Black

Other:
Spellbinders Dies
ColorBox Black Ink
Gina K Designs Stamps
Basic Grey patterned paper

enjoy!!
AJ

Saturday, December 15, 2012

A Holiday for the Birds

Hi, Allie here with a Shabby Chic Holiday Tutorial.
Let's embellish a Bird Cage for the winter holidays.
I'm using this pretty Bird Cage on my door.


Begin by applying a layer of gesso. Use a dry brush technique, with
very little paint. Simply swish it back and forth.


While the paint is drying, you can apply patterned paper to the background piece.
Once the bird cage front is dry, sponge on ink.


Paint the Fancy Chipboard Title "Noel" with gesso.
Once the gesso is dry, lightly brush on Liquid Glass
and liberally sprinkle Sugar Shimmer.

Now, you're ready to decorate!
This project is embellished with an ornament,
a Frilly Flourish Swirl, some brads, and flowers.


Products Used

Designer Embellies - Bonnie's Bird Cage
Frilly Flourish Swirl - Silver Rhinestone
NOEL - Fancy Chipboard Word

Partner Products Used

Patterned Paper from the Secret Garden Collection - My Little Shoebox
Please visit the My Little Shoebox Blog for more inspiration!
Sugar Shimmer - Designed by Donna Salazar for ClearSnap

Additional Products

Snowflake Ornament - Big Lots
Paint - Claudine Hellmuth
Ink and Liquid Glass - Close To My Heart
Snowflake Brads - Creative Impressions
Flowers - Prima

Thanks for joining us today. Be sure to check out our sale. You can click here - or on Santa up above.
Leave us a comment - tell us your favorite thing to do with chipboard - and you'll have a chance to win some Fancy Chipboard Words.

Friday, December 14, 2012

Sending Christmas Cheer

Happy Holidays, Want2Scrap friends!  Today, I am sharing my latest layout with wonderful products from Want2Scrap and My Little Shoebox.  I was so happy to create a Christmas layout with non-traditional paper and stickers.  Want2Scrap festive bling can give any project Christmas Cheer.


 I like to add ink to these lovely chipboard words.  The texture of the corrugated chipboard letters is wonderful.  I used a combination of amazing My Little Shoebox collections of papers, stickers, and diecuts--Notebook, Oh Deer, Secret Garden, Vintage Shop. Other must-have products include: Beacon Adhesives Quick Grip, Clearsnap Colorbox Catseye Ink and GlueArts 3D Adhesive Foam,


Thank you for visiting the blog!  We love your comments and suggestions.  
Create something beautiful today.

Leave a comment here about how you like to decorate chipboard 
for a chance to be entered to win a special package of our Fancy Chipboard Words. 
Like us and comment on our Facebook Page for an additional chance to win. 
We love hearing what you like to do with our products.


Thursday, December 13, 2012

Ornaments to REMEMBER!

Hello, to YOU!  All the lovers of bling and the GREAT Want2Scrap® thing!  It is I, Elise, & I bid you tidings of GREAT, blinged-out holiday joy and adorable memories!


For your holiday inspiration, I have assembled a handsome assortment of delightful Want2Scrap® products and goodies galore, to dazzle your crafty, scrappy side... So..., if you have the means, I recommend a large frothy cup of peppermint mocha and a notepad, uh, r, SHOPPING list....{!} You're gonna WANT2Scrap!  {LOL}


Scrapbook memories do NOT have to be confined to an album.  Why NOT celebrate some memories of the most WONDERFUL time of the year, right thar on ye old Christmas tree!  The most GLORIOUS time of year + Want2Scrap® bling = the MOST sparkly thing!  My job is to INSPIRE you to use PHOTOGRAPHS to embellish your holiday tree.

Start with photographs of your choosing, reduced by 50%, as shown...


Select Want2Scrap® Nestaboard shapes to become the foundation of your ornament, and then prepare background.  For the "boy" ornament, I busted out my old favorite, faux woodgrain, using a home decor wood-graining tool and acrylic paint, direct to Nestaboard.


Just apply paint, then drag the tool in one direction, gently, but firmly rocking the handle, to create this extraordinary, but easy wood grain effect.   


Isn't THAT fun and purdy?   If you want to see more ideas on applying this technique, I hope you'll visit my post, here, where I share more detail into playing with wood grain! 


For a girlier background - how about THIS fun paper from My Little Shoebox!  

{Yum!}

With proper backdrop and STUNNING Nestabling®, ornaments are READY to shine!  Using Chipboard Sentiments, Words of Love, I had ALL the sentiment I could use, to illustrate HOW happy these memories make me!   J-O-Y is the word, and JOY is how I felt, embellishing these LOVELY letters with Designer Foil! I'm DEFINITELY feeling the L-O-V-E!


{OH MY GOODNESS!  Hi, there, Santa!  You're NICE!}


Can YOU feel the it, the sparkly the MAGIC of Christmas, blinged out with Want2Scrap®? 


But, WAIT!  There's MORE! 


Nothing calls for a lil' EXTRA sugar, like the holidays!  Lookee HOW glorious this word looks embellished with Sugar Shimmer, Fairy Dust Glimmer from Clearsnap!  I'm SO in LOVE, I have GOT to LAUGH!  {LOL}  Oh, THAT lil' girl makes me laugh, too.  She NEVER sat with Santa!  This is my FAVORITE picture, because the camera literally, caught her, mid BOLT off of Santa's lap!  Hard to fault a girl for NOT wanting to hang with a stranger in a red suit...  Sigh.  Memories!


Are YOU ready?  If you haven't liked us on facebook, I HIGHLY recommend giving Want2Scrap the big thumb's up!  You'll learn about our latest specials and HUGE opportunities for inspiration and sparkly delight, BEFORE the masses!  We ADORE sharing the brightness with you all!  Here's hoping YOUR holidays and filled with JOY and LAUGHTER and .... {wait for it...} LOTS and LOTS of BLING!  Merry, Merry!


Thanks, so MUCH for letting me SPARKLE for YOU!


Want2Scrap Products Used:

Nestaboard Labels Twenty Five
Nestaboard Labels Twenty Four
Chipboard Sentiments Words of Love
Pine Tree Chipboard Embellishments - Package of 4
Nestabling Labels Twenty Five, Silver Rhinestone
Nestabling Labels Twenty Four, Silver Rhinestone
Nestabling Sprightly Sprockets, Clear - by Donna Salazar

Cross Promotional Products

Designer Paper - My Little Shoebox
Clearsnap - Fairy Dust Glitter Sugar Shimmer
Clearsnap - Designer Foil Cherry Pie
Eco Green Crafts - Acrylic Paint

Other:

Tissue Tape - Tim Holtz/Advantus
Stamps - October Afternoon


Tuesday, December 11, 2012

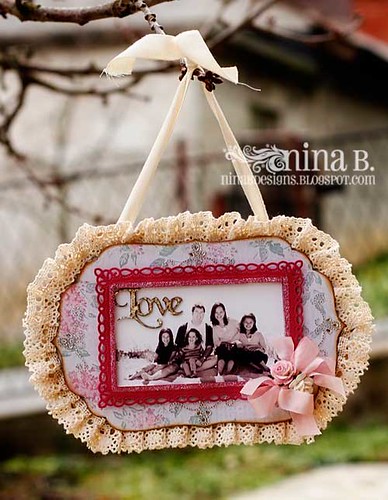
Shabby Hanging Frame

Nina here on the blog and today. Giving handmade is one of my favorite Christmas traditions. I'm showing you today a gift that is a labor of love that will surely delight my parents this Christmas. I hope they're not reading this post :).
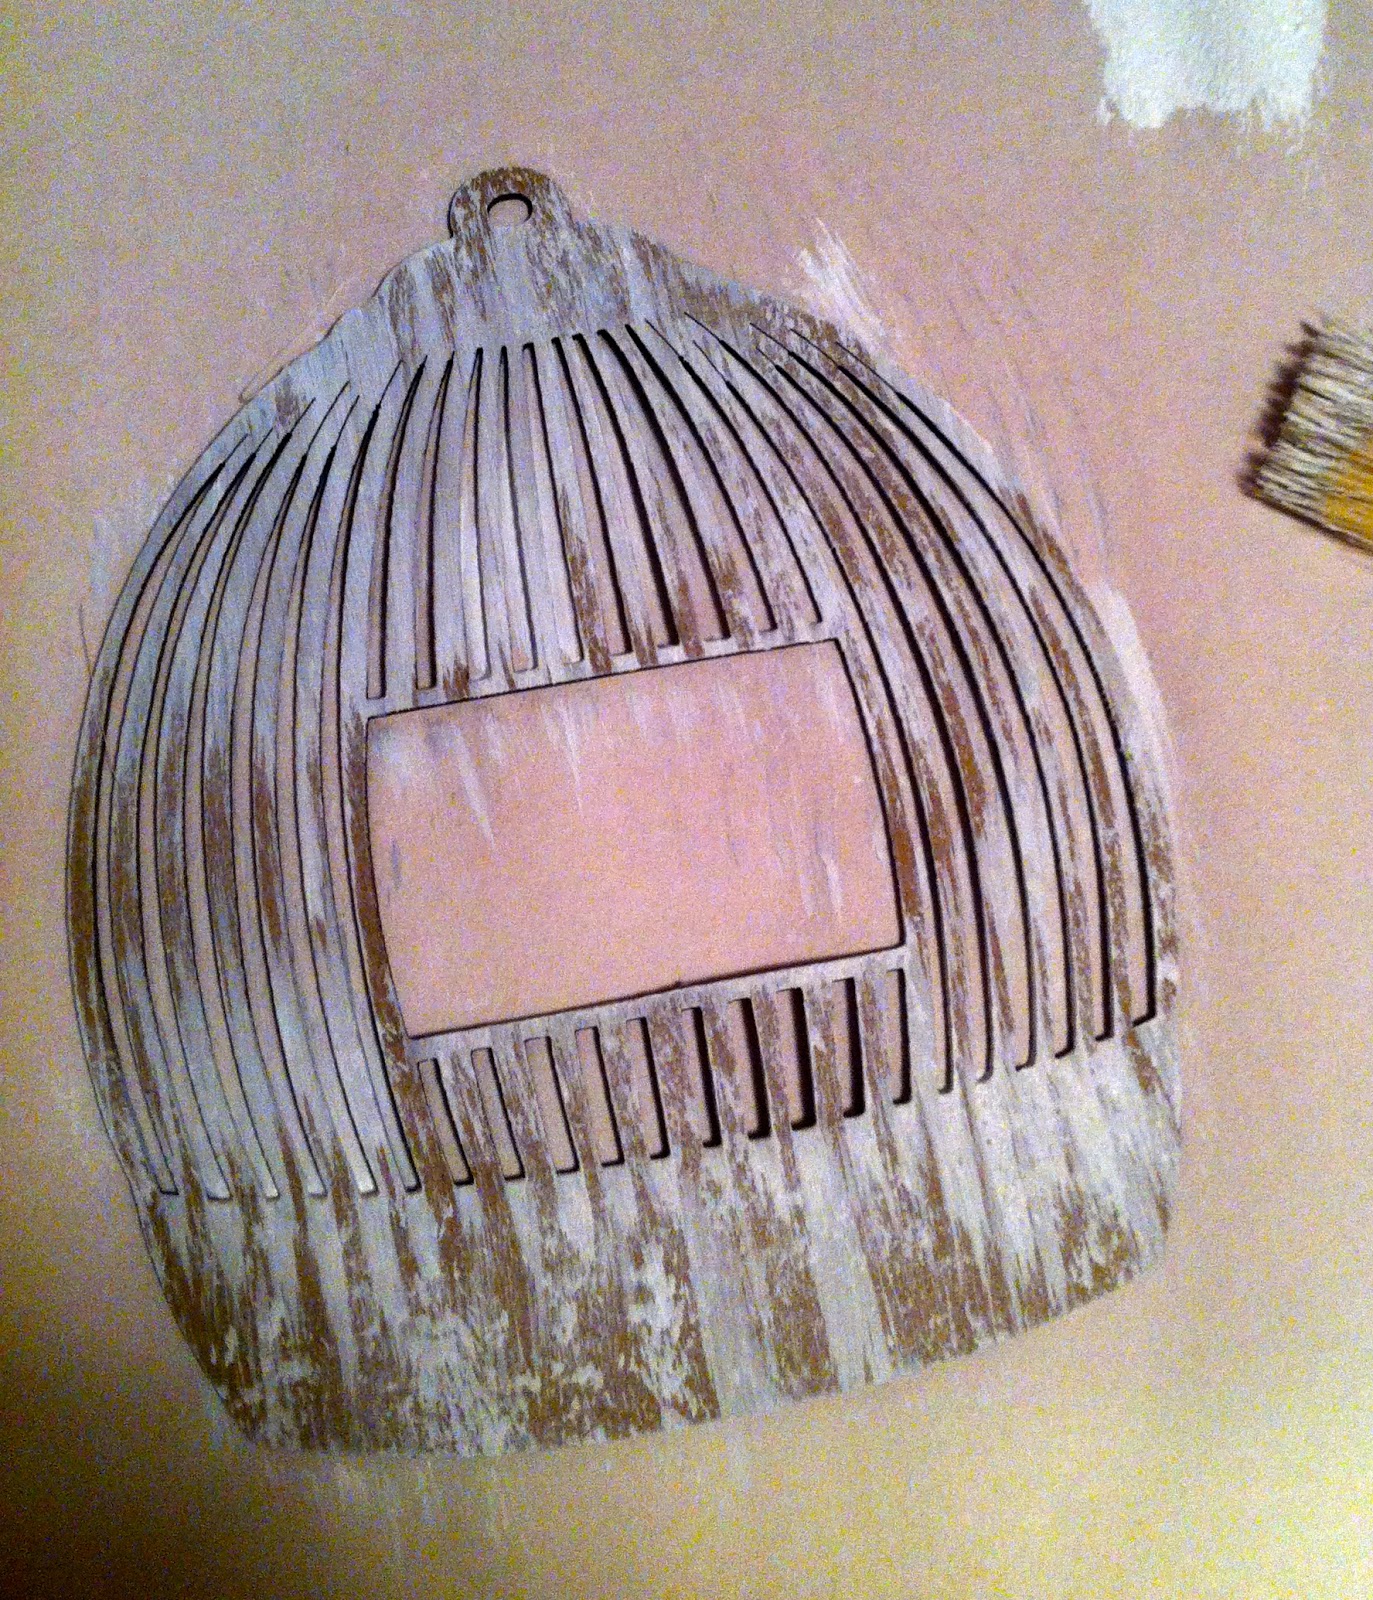
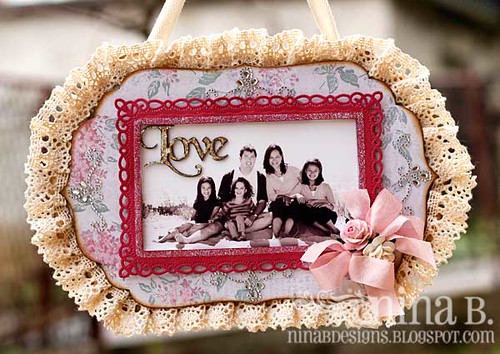
I started with two pieces from the Grand Chipboard Album - Labels Four. I covered the front with Melissa Frances papers with inked edges and adhered the pleated lace right on the edge using Beacon Adhesive's Fabri-Tac.
W2S-Frame
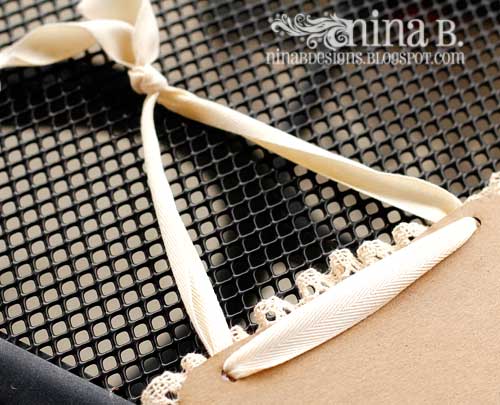
I punch two holes on the back of another piece of chipboard album and threaded the twill ribbon through, tied a knot and made a hanger for my frame. I adhered this piece to the back of my decorated piece.
W2S-Frame4
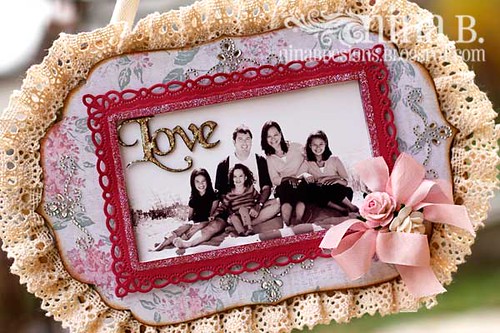
Here is the close up of the front. I placed Beautiful Bling Borders-Fancy That! on the four corners. I die cut a Spellbinders' Romantic Rectangle in a coordinating cardstock. I placed Scor-tape along the edge and sprinkled Art Glitter on it.  I adhered the photo in the center of the frame using GlueArts U-Cut-It® 4x4 to add dimension. I adhered the frame to the center.
W2S-Frame1
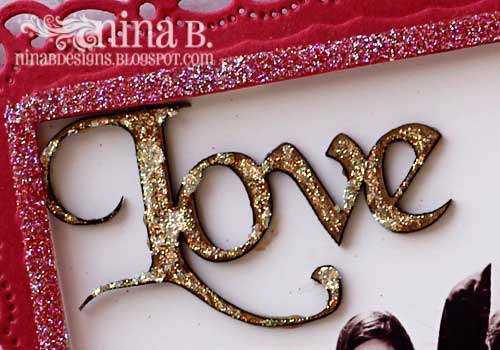
I then covered the "Love" from Chipboard Sentiments- Words of Love with glue and sprinkled Art Glitter on it as well and adhered it right on the photo. You can see here closely the glittered edges of the frame.
W2S-Frame3
To finish the hanging frame, I adhered a seam binding bow and two paper roses on the bottom right corner.
W2S-Frame2
How about you? Do you like making handmade gifts for the holidays? I enjoy making and giving them away because it feels like I'm giving a part of myself when I do. It is especially fun when you get the whole family involved.

Want2Scrap Products used:


Come visit me on my blog, Crafting in Croatia.

LinkWithin

Related Posts with Thumbnails
Pin It button on image hover