Thursday, March 30, 2017

Want2Scrap Beautiful Roses and Bling Borders

Hello Want2Scrap fans - it is Linda on the Blog today to share a pretty card with Beautiful Bling Borders and pearls.  One of the things I love about Want2Scrap bling is the way you can 'mix and match' to create your own unique bling - perfect for any project!


The card base has been cut/embossed using A2 Matting Basics A Card Creator,  Patterned paper has been cut slightly smaller and embossed using the Spellbinders Em-Bossing Fold'ers Overlapping Circles 4.25 X 5.5 In Single Sided.  Next it has been adhered to the card base using double sided tape.


The patterned paper has been cut/embossed using Spellbinders Labels Five and adhered onto the co-ordinating Nestaboard.  The edges have been sponged using brown ink and a sponge dauber and adhere to the top portion of the layered card base using Beacon Adhesive Zip Dry Liquid Glue.  The beautiful layered rose by Anna Griffin Inc has been adhered to the centre of the Nestaboard using the liquid glue.


The Beautiful Bling Borders - Fancy That! have been trimmed and adhered to the top and sides of  the Nestaboard and small pearls from the 250 Count Pearls - White added.  White Seam Binding has been randomly pleated along the lower edge of the Nestaboard and light yellow double seam binding bow glued onto the left with a recycled pearl button added.  Finishing off with a row of yellow lace.


Want2Scrap Products:
Other: SpellbindersA2 Matting Basics B Card Creator; Em-Bossing Fold'ers Overlapping Circles 4.25 X 5.5 In Single Sided; Labels; S4-229 Labels Five Nestabilities; Scrapbook Adhesives by 3L:  E-Z Adhesive Runner, 3D Foam Squares; Beacon Adhesive: Zip Dry Liquid Glue; Anna Griffin Inc. Embellishment.

Thanks so much for stopping by and the lovely comments you leave - they are appreciated.  I hope you are inspired to add some of the beautiful Want2Scrap pearls to your projects
.
I would love you to visit me on my Blog: Lovely Linda's Craft Central


Monday, March 13, 2017

Beginning to Look a Lot Like Christmas!

Susie here today sharing a Christmas layout I created using two of the wonderful laser cut overlays available from Want2Scrap!


I absolutely love to decorate for Christmas and one of the first things that came out of the boxes this past year was our collection of nutcrackers! I realized I needed to scrapbook them and of course I found the perfect starting point with Want2Scrap overlays.  This is how the overlays looked when I started:

Let me tell you that the red paper is the same on each overlay although the photography makes them look like different colors.  Sorry about that!  :)  You can see that each of the overlays come with  a white paper background that provides a photo mat inside of each of the openings - such a nice detail!


Don't feel like you need to fill each opening with a picture - although I did do that for the photo on the right!  I use the openings to group pictures and related embellishments and I like to include a lot of pictures on my layouts! I used patterned paper to create a background for my mini collages in two of the openings.  I chose the Holiday Cheer Collection from Photo Play Paper because it had a nutcracker theme!

This overlay actually has a laser cut Santa's hat and sparkles which would make it perfect for "Visit with Santa" pictures.  My theme for this page was different so I created an embellishment cluster to cover up that area.

The built in laser cut title is my favorite part of any overlay because it just makes my life easier!  The paper pack I was working with had a color pallette that included both white and tan.  I chose one of the papers with a tan pattern and used it to back most of the title area. I left the area behind the word "Christmas" white so that it would really stand out and  I added a dimensional wooden exclamation point!


Next I used the "Christmas Tree Second Page" overlay. I want to point out that you can flip this page around and orient it any way you want to suit your pictures and embellishments.  I just love having options!

Here is a look at the finished page.  I love treating each opening like a mini scrapbook page!


So time to get out those Christmas pictures and get them into your scrapbook!  Be sure to check out the Want2Scrap Store for our full selection of 12x12 and 6x6 overlays!

Want2Scrap Supplies:


Other Supplies: Photo Play Paper - Holiday Cheer, Flair buttons, wood chippies, kraft tag


Thanks for stopping by and I hope you find some time to play!  Susie

Friday, March 10, 2017

Want2Scrap Beautiful Bling and Unicorns

Hello Want2Scrap fans - it is Linda on the Blog today, sharing a whimsical card with a beautiful Bling border.


The card base has been cut/embossed using A2 Matting Basics A Card Creator,  The hand made patchwork paper has also been cut/embossed using A2 Matting Basics A Card Creator


The Sentiment has been popped up onto the patchwork panel using 3D Foam Squares.  The Die-cut Flowers have been layered just under the lower edge of the sentiment using  Beacon Adhesive: Zip Dry Liquid glue.  Buttons have been adhered to the flower centre and a white pearl added to the centre of the outer two flowers.


Beautiful Bling Borders by Nina Brackett - Beautiful Blooms have been adhered along the base of the patchwork layer and 250 Count Pearls - White added along the Beautiful Blooms - as shown in the photo above.


Want2Scrap Products:
Other: Spellbinders: A2 Matting Basics B Card Creator; S6-032 Flower Play Shapeabilities; Scrapbook Adhesives by 3L E-Z Adhesive Runner, 3D Foam Squares; Beacon Adhesive: Zip Dry Liquid Glue; Sentiment Die cut from Typo; Handmade patchwork paper; 3 Buttons


Thanks so much for stopping by and the lovely comments you leave - they are appreciated.  I hope you are inspired to add some of the beautiful Want2Scrap pearls to your projects
.
I would love you to visit me on my Blog: Lovely Linda's Craft Central

Hugs and Happy Creating

Wednesday, March 8, 2017

Game On! with Pokemon Go!

Pokemon Go is the latest gaming craze and of course Want2Scrap has the perfect overlay to scrapbook those memories: Game On!
Click on any picture to see a larger image.

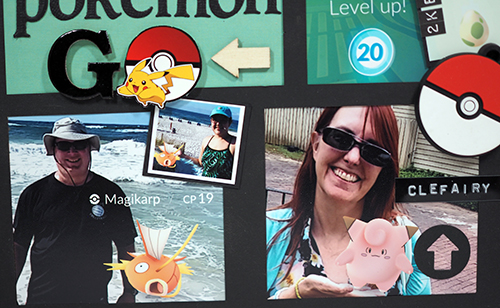
My favorite part of any Want2Scrap overlay is the title area.  I love the font on this one and didn't feel as though it needed a whole lot of dressing up. The little Pikachu I used to embellish the title area came off of a lanyard I found at WalMart!


This little guy was actually cut out of the lanyard packaging and adhered with foam pop dots.


But what kind of pictures do you use on a layout about a cell phone game?  Screen shots of course!  There are standard graphics and phrases that any Pokemon Trainer sees every day:  The Pokemon broke free?  You walked how far?  You finally have enough candy to evolve that Pokemon!  Congratulations - you levelled up!!

There are real world photo ops, too!  How about this one of my daughter battling into a gym - in the rain!

 And of course you can always use the ap take pictures of Pokemon in the real world!


This overlay is very versatile and can be used for pretty much any kind of gaming.  Here is a page where I used the same overlay for one of my great nephews playing with a remote control car.  I spent a little more time altering the title with Want2Scrap Shiny Chrome Drops!  You can find the details for this layout HERE.

Want2Scrap has a wide selection of overlays that make great starting points for layouts.  Be sure to check out both sizes: 12x12 and 6x6.  Happy scrapping!

 Thanks for stopping by and I hope you find some time to play today!  Susie

Supplies for Want2Scrap Pokemon Go Layout:

Other supplies:  

Monday, March 6, 2017

Want2Scrap Secret Garden Card


Hello Want2Scrap fans - it is Linda here today I am sharing a pretty and elegant card created using Want2Scrap Silver Rhinestones and pearls - check out those gorgeous swirls - how beautiful they are!  They add instant elegance to any project - and we love that - don't we!!


The Graphic 45 Secret Garden paper has been cut/embossed using Spellbinders Labels 44  this has been popped up onto embossed card stock - embossed using the Spellbinders Cabbage Roses embossing folder,


Scrapbook Adhesives by 3L3D Foam Squares are used in every 'popped up' layer - they give such a nice amount of dimension without being too much - especially these days when postage can be expensive.

Lace has been added to the top and bottom edges of the embossed card stock, with a recycled button on each corner and a 250 Count Pearls White adhered to each button.  This makes such an easy embellishment - great for using up all of those button that gather and seem to multiply!!


Three Mulberry Paper Flowers (12 Flowers) - 3/8" Purple have been glued to the side of the Labels 44, on top of lace flowers,  The Inspire Swirls (2 Pack) by Nina Bracekett - Silver Rhintestones have been trimmed and added each side of the Mulberry Roses, flowing onto the embossed paper and the Labels 44.  This has all been layered onto a pre-cut card base.


Want2Scrap Supplies:

Other: Spellbinders : S4-486 Labels 44 Etched Dies; ES-016 Cabbage Roses Embossing Folder    Graphic 45: Secret Garden Collection; Scrapbook Adhesives by 3L E-Z Adhesive Runner, 3D Foam Squares; Beacon Adhesive: Zip Dry Liquid Glue;  lace, recycled lace flower; recycled buttons


Thanks so much for stopping by and the lovely comments you leave - they are appreciated.  I hope you are inspired to add some of the beautiful Want2Scrap pearls to your projects
.
I would love you to visit me on my Blog: Lovely Linda's Craft Central
Hugs and Happy Creating


LinkWithin

Related Posts with Thumbnails
Pin It button on image hover