Tuesday, October 31, 2017

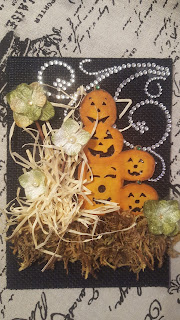
Pumpkin Stack

Hello Want2scrap friends, Lovita here! Today I want to share with you one of my fall cards.


I just love the texture and look of burlap so, I used a black 5x7 card as a base for this design. I  began by placing a Want2Scrap Silver Rhinestone Swirl in the top right corner of the card.


I painted the Want2Scrap chipboard shaped Small Pumpkin Stack using Americana paint in Cadmium Yellow and Bright Orange. I used Dark Chocolate to distress the edges and define the individual pumpkins and sealed it using three coats of Mod Podge Satin. I glued 3mm dark green rhinestones in place of the pumpkin stems and placed the finished chipboard piece onto the card just below and slightly covering the Silver Rhinestone Swirl.


I then glued natural raffia and pete moss onto seperate pieces of black cardstock and secured them onto the card using hot glue. I used Color Box Mix'd Media Inx-Leather to stain two toothpicks and glued one flower to the end of each. I placed them within the natural raffia to give the effect of flowers growing from straw or hay.


In the flower centers are a white pearl bead or a tan 3mm rhinestone.


Monday, October 30, 2017

Believe Mixed Media

Good morning Blogger Friends!

This mixed media piece was so much fun to create!!!  It's a combination of so many different products and techniques.  First I will begin with the step-by-step instructions.


Prepare the canvas by painting a coat of Gesso over the top and each side.

Dry the canvas with a heat gun.

Lay down the embellishments and a piece of paper where a picture would go. Using a pencil, lightly draw a line around the area where the embellishments will go.  Remove all of the pieces.

You want to have a solid surface directly under the canvas where a stenciled image will be.  Place the canvas on top of a large book.  Lay the stencil on the canvas and take a spatula full of modeling paste and rub over the stencil.  I used a motel room key for the larger stencils.  Dry the images with a heat gun.  Clean the stencils immediately after each use.  It is NOT fun trying to clean stencils with dried modeling paste!

Adhere the lace, drywall tape, cheesecloth, doily, and paper.

Let the fun begin by spritzing and spraying your canvas with color.  On the brick stencils, I spritzed a reddish-bronze color.  If the color is to concentrated, thin it out with a spritz of water.  To blend colors, spritz with water and blend with a paint brush or tap the canvas on the sides to move the color.  To create the glass rings, spritz a mat with color, set a cup in the color then set the cup on the canvas.  Once you have achieved the desired color effects, dry with a heat gun.  I dry brushed white acrylic paint over the high areas to add another dimension.

Adhere embellishments.

Enjoy!


Products used:

Want 2 Scrap- Believe, Key & Gear Chipboard         Melissa Frances Birdcage
Lindy's Stamp Gang Sprays
Tattered Angels Sprays
BoBunny-Mama Razzi Striped paper
Modeling Paste
Gesso
Zip Dry
Prima-Flowers
Spellbinders-Circle Bezel
Buttons & Brads

Saturday, October 28, 2017

Embellished Autumn Tag

Hello Want2scrap friends, Lovita here! Today I have a simple Autumn tag design for you.

Items used are; Want2Scrap Chipboard Embellishment Style E, fall leaves, 2x6 piece of canvas, burlap net wired ribbon, white applique, 1/4" rhinestone, and Want2Scrap Couture Swirls by Nina Brackett-White Pearls.


I cut a hole in the middle of the 2" end of the canvas and frayed the edges. I attached a 6" long piece of net ribbon onto the left side and a white applique down the middle and accented it with a rhinestone. I randomly grouped a variety of leaves of different colors and sizes and glued thrm down. I blinged up a Want2Scrap Style E Embellishment using Want2Scrap Couture Swirls by Nina Brackett-White Pearls and secured it to the bottom of the tag. I finished by looping narrow ivory and tan trim through the hole at the top.


There you have it! A quick and simple Autumn tag. Happy crafting!

Belle Vie

Happy Sunday everyone!

I took a walk down memory lane with these cards that remind me of my time in Paris, France with my daughter this summer.  We saw flowers in full bloom outside every window and the aroma from the bakeries was intoxicating. I can't wait to go back!


Belle Vie (beautiful life)  card was created using Julie Nutting paper line "Belle Vie"
Die-cut from My Treasured Kutz (MTK-CK-4065 Flourishing Foliage-leaves)
Die-cut from Die-namics (Mini Royal Roses)
Want 2 Scrap 6106 Frilly Flourish Swirl-White Pearls
Embossing Folders by Sizzix and rose ribbon
Metallic Lustre (Champagne Ice) is rubbed over the raised areas from the embossing folder and the tips of the roses.
Zip Dry
 "hello" is a trifold card created using the same paper from Julie Nutting.
Die-cuts from Spellbinders
Want 2 Scrap 3059 Funky Swirls Rhinestones-Silver
Chestnut Roan Cat eye Ink pad
Zip Dry
Eiffel Tower card is a bit more complicated.  I used all the above supplies.  The Eiffel tower paper is a cut into a circle with a portion of it tucked under the journal card on the inside of the card.  This allows the Eiffel tower to be tucked under the roses on the front of the card.

I hope you are all enjoying the beautiful fall colors, the crisp air and finding time to create!

Much love from Colorado!
Michelle Hahn


Friday, October 27, 2017

Upcycled Jars using Want2Scrap Nestabling

Hello Want2Scrap friends, it is Linda here back on the Blog to share a quick and easy projects usingWant2Scrap products.  I am a keen recycler and am always looking around the house to see what can be recycled/upcycled - this time I have found the answer in the fridge - let's just say that Jam Jars will never be the same - they come in so many wonderful shapes and sizes and are just begging to be given a 'second chance!'


 Follow along with the tutorial and you can see just how easy it is to reuse your jars and make them the envy of your friends!


Once the jars have been washed and are thoroughly dry I adhered the beautiful badges I was given by a friend.  One of them fitted on the lid perfectly but the second one needed more, so I headed to my Want2Scrap supplies!


I adhered a row of  Petite Ivory Crochet Trim around the sides of the jar, making sure it was securely taped using Double Sided Premium Tape by Want2Scrap - 1/4" x 150 yards, which holds it in place beautifully.  Two rows of Nestabling Heart Circles Black Rhinestones were added  to the lid, the inner row takes care of the gap that was left by the badge being a little too small.


A row of tape/ribbon was adhered around the second jar using Double Sided Premium Tape by Want2Scrap - 1/4" x 150 yards and a row of  Nestabling Heart Circles Black Rhinestones added around the badge.  Finishing off with twine wrapped around the top of the jars and heldnin place by Scrapbook Adhesives BY 3L Strong Tape.- and a button added - embellishing is where you can make it your own - so many possibilities.  These jars are now in The Studio and I am sure others will be joining them before too long.  They also make great gifts can can be filled with Bath Salts, Small Soaps, Chocolates to name a few.

Other: Beacon Adhesive: Zip Dry Liquid Glue; Badges; lace, buttons, twine; recycled glass jars: Scrapbook Adhesives BY 3L: Strong Tape.

Thanks so much for stopping by and the lovely comments you leave - they are appreciated.  I hope you are inspired to add some of the beautiful Want2Scrap pearls to your projects
.
I would love you to visit me on my Blog: Lovely Linda's Craft Central
{{{Hugs}}} and Happy Creating


Thursday, October 26, 2017

A great Gift Idea

A Great Gift Idea

This is an easy to create notebook cover which makes a great gift without a large expense.

Cut a 12"x12" paper into 8"x 10 3/4"(a)
Cut a heavy piece of chipboard 5 1/4" x 8" (b)
Cut a piece of pattern paper 5 1/4" x 8" (c)
Cut a strip of pattern paper 1 1/4" x 6 1/2"(d)
Place a notebook on the 8"x 10 3/4" and mark where you need to crease the paper.
I made two creases, one at the  5 2/16th" and the 5 5/16"


Adhere b and c together
Place c on top of b and c and fold the edges over.  Adhere the edges on the back.
Adhere b,c on the inside of a
Slide the back of the notepad thru the strip
Fold over and decorate the top


Cut a stip of lace that is 8" long
Cut a strip of card stock and pattern paper that is 2 1/4" x 8"
Punch out a decorative edge on the pattern paper
Emboss the card stock
Ink all of the edges with Chestnut Roan cat eye ink pad and begin layering

Tuck pearl swirls under the lace and under the flowers.

Supplies used:
Want 2 Scrap-Couture Swirls by Nina Brackett White Pearls
BoBunny paper
Note pad
Zip Dry
Chipboard
Flowers
Lace

Happy Creating!!!

Tuesday, October 24, 2017

Want2Scrap Outdoor Boy Layout with Chipboard and Stencil

Hello Want2Scrap fans - it is Linda here today - thank you for stopping by! I am sharing a layout  created using Want2Scrap Chipboard and a stencil and I have so many photos of my precious Grandson to scrapbook and love all that Want2Scrap offer - it makes it so much easier - and is so inspiring - you have to love that! 


The Gear Corners 2 Pack Chipboard Embellishment has been sponged using Shimmering Silver and Golden Glitz to create a metallic look.  It has then been adhered to the top right hand corner using Beacon Adhesive: Zip Dry Liquid Glue.

The Film Strip (4 pack) - Chipboard Embellishment has been sponged using Teal Zeal  and Wedding Dress.  The edges have been defined using a White Gel Pen.  It has been adhered to the lower left portion of layout using liquid glue.  The letters have been sanded around the edges and popped up inside the firm strip using  3D Foam Squares.

Now for the photos - all three have been cut/embossed using the Pierced Squares Etched Dies and lightly sanded around the edges - love the look that gives.  They have been overlapped onto each other and adhered using double sided tape.

The 'sentiment' stickers have been sanded around the edges and centered above the photos, tilting the second letter.

Using the Brick Stencils, Crackle Paste has been added around the photos - in both big and small sections - the stencils wash clean with warm soapy water.  Stenciling is such a a great effect and very quick and easy - so many mediums can be used - ink, paint, gesso just to name a few.

I have added Corrugated cardboard, sticker sentiments, brads and paint splatters to personalise and finish off.


Want2Scrap Supplies:

Cross Promotional Partners: 


Spellbinders: Pierced Squares Etched Dies; Platinum6 Die Cutting and Embossing Machine - 6"
Beacon Adhesive: Zip Dry Liquid Glue

Other: Scrapbook Adhesives by 3L: E-Z Adhesive Runner; 3D Foam Squares; Patterned Paper; Imagine: Delicata in Shimmering Silver and Golden Glitz; Memento in Teal Zeal, Memento Luxe in Wedding Dress; Crackle Texture Paste; Tim Holtz: Alphabet Stickers; Kaisercraft: Brads; Corrugated Cardboard, White Paint; Whote Gel pen; Stickers; Sanding Block

Thanks so much for stopping by and the lovely comments you leave - they are appreciated.  I hope you are inspired to add some of the beautiful Want2Scrap pearls to your projects
.
I would love you to visit me on my Blog: Lovely Linda's Craft Central

Hugs and Happy Creating


Monday, October 23, 2017

Ice Cream Sundae with Bling


Candy here and today I am sharing my Ice Cream Sundae Card featuring Want2Scrap Sleek Strips Rhinestones in Red and Want2Scrap Sleek Strips Rhinestones in Black. The design paper is from Heartfelt Creations Young At Heart Collection and the stamp is from Heartfelt Creations Berry Delicious Cling Stamp Set with its coordinating Berry Cafe Die,


I die cut the the design paper using Spellbinders and sponged the edges of the blue design paper with Teal Zeal Ink.  I then adhered the design paper using pop dots and adhesive as needed.  I stamped the sundae image on white card stock with Tuxedo Black Ink and colored it with Copics.  I added Ensalada Glitter to the green stem and leaves and Pompeii Glitter to the ice cream sundae glass.  I adhered the sundae using pop dots to the center of the card front.  I adhered the sentiment as shown.  I added the Black and Red Sleek Strip Rhinestones to the design paper, as shown.  I also cut one red and one black rhinestone from each of the Sleek Strips and adhered it to the sentiment. Finally,  I finished by adhering a large Black Pearl and a large Red Pearl to the upper left hand corner.


Have a great day,


Want2Scrap Products:

Want2Scrap Sleek Strips Rhinestones - Black
Want2Scrap Sleek Strips Rhinestone - Red
72 Count - Black Pearls - Self Adhesive
72 Count - Red Pearls - Self Adhesive

Cross Promotional Partner Products:
Heartfelt Creations Berry Delictious Cling Stamp Set and Berry Cafe Die
Spellbinders 6x6 Matting Basics A Card Creaters Etched Dies

Other Products:  White Cardstock; Memento Dye Ink Pad - Tuxedo Black and Teal Zeal; Copoics; Art Glitter Ultrafine Transparent  -  Ensalada and  Pompeii

Saturday, October 21, 2017

Band 6 x 6 Overlay in Chipboard Album

Candy here and today I am sharing some inspiration using the Band - 6 x 6 Overlay.  My youngest daughter graduated from high school last year so I am starting to make a memory album using Want2Scrap's 6 x 6 Overlays in Want2Scrap's 8 x 8 Square Chipboard Album. I adhered the design paper from Scrapbook Customs with Zip Dry.


I cut my pictures to fit and then adhered it with Art Glitter Dries Clear Adhesive.  Then also with the Dries Clear Adhesive with a fine metal tip I added some Pompeii Glitter to the instruments on the Band Overlay.


At the top of the layout I adhered the Bella Bling Brackets and added several Royal Blue Pearls.


Want2Scrap's 6 x 6 Overlays really create a quick and elegant layout in a mini album.  I look forward to sharing with you more pages and ideas using the 6 x 6 Overlays.  Have a great day!


Want2Scrap Products:

8 x 8 Square Chipboard Album
Band - 6 x 6 Overlay
Bling Brackets by Nina Brackett - Bella 
Bulk Bling Pearls - Royal Blue

Other Products:

Beacon Adhesives Zip Dry; Paper - Scrapbook Customs; Art Glitter Dries Clear Adhesive; Art Glitter Metal Tip; Art Glitter Transparent Ultrafine - Pompeii

Wednesday, October 18, 2017

Halloween Nestabling Style


Hello Everyone, Terre here with a Halloween Banner Nestabling Style. For this decorative banner I used Want2Scrap© Labels 25 Nestaboard, older style Halloween paper from My Minds Eye, Beacon Adhesives Zip Dry and Spellbinders Labels 25 die template.


To make the banner panels pop, I used Want2Scrap© Nestabling Heart Circles Black Rhinestones


The stamp set I used is from Quietfire Designs and the ink I used is from Imagine Crafts Memento Black Tuxedo.

I hope you have enjoyed this creative Halloween Banner, make sure to stop back by for more inspiration from my other design team members, Linda Lucas, Lovita Reed, Michelle Hahn and Candy Slabaugh.

Crafty Smiles,


Monday, October 16, 2017

Want2Scrap Bling Circles and Pearls

Hello Want2Scrap friends, it is Linda here on the Blog, thank you for stopping by. I sharing a card using  Nestabling and my all time addiction - pearls - I love the way bling can add so much to a project and can be combined for a wonderful effect!


The card base has been cut from white card stock using Spellbinders Labels 46 Decorative Elements Etched Die #3 (#1 being the smallest) Cut two #3 Dies, score the top of one at 1cm and fold forward.  Add adhesive to the 1cm portion, attach the front being sure to line up the pattern - Making a patterned card base has never been so easy!

  The insert is also cut using the Labels 46 Decorative Elements #2 and lightly patterned paper.  Using pink and a sponge dauber, lightly sponge the ink into the flowers on the patterned paper.  Adhere to the card base using liquid glue.


Stamp the sentiment from the Spellbinders Special Birthday Sentiments Stamps using Black Ink.  Cut/emboss the using the Standard Circles Etched Dies.  Pop up the Die cut Standard Circle using 3D Foam Squares.  Adhere Nestabling - Heart Circles - Pink Rhinestones around the sentiment.


Glue a double Seam Binding Bow to the left side of the tag and adhere a Mulberry Paper Rose to the center.  White pearls have been placed around the card front.


Other: 
Spellbinders: S4-116 Standard Circles SM; S4-494 Nestabilities Labels 46 - Decorative Element Etched Dies;  SBS-096 Classic Spellbinders Special Birthday Sentiments Stamps:  Scrapbook Adhesives BY 3L: E-Z Dots Permanent Refillable Dispenser, 3D Foam Squares; Beacon Adhesive: Zip Dry Liquid Glue;   Imagine Memento Ink in Tuxedo Black and Angel Pink; Pink Seam Binding; Small Mulberry Paper Rose

Thanks so much for stopping by and the lovely comments you leave - they are appreciated.  I hope you are inspired to 
.
I would love you to visit me on my Blog: Lovely Linda's Craft Central

{{{Hugs}}} and Happy Creating


Friday, October 13, 2017

Pink Flutter


 Hello Want2Scrap friends, Lovita Redd here! I wanted to share with you my Pink Flutter Card accented with Want2Scrap's White Butterfly.
I used a 5 x 7 burlap blank card as a base. I then took a floral note card, cut it and distressed the edges of the cut pieces. Parts are accented with a pink scalloped nylon lace trim, 1/4" ivory and 1/2"  pink Chinese braid, 5/8" natural with pearl center Offray trim, 3mm rhinestone trim, raffia ribbon in dark pink, and Want2Scrap's Pink Pom Pom trim.


I used Want2Scrap Chipboard Embellishments, Stamp and Style E accented with Crystal Diamond glitter.

Wednesday, October 11, 2017

Want2Scrap Chipboard Teacup and Blinged Doily Card

Hello Want2Scrap friends, it is Linda here back on the Blog to share a beautiful shabby card using a number of Want2Scrap products.  Follow along with the tutorial and you can see just what they are and how easy they are to use on your projects.


I have used coloured a Chipboard Teacup using Rose Bud ink and a Sponge Dauber.  Once this has dried I have randomly stamped the flowers and some leaves from the Floral Set Stamp and Die Set using Rhubarb stalk and Bamboo Leaves Ink.  The chipboard takes ink so easily and does not soak it all up - which I am sure you will agree makes it a lot easier! 

I have used Chameleon Pens to add detail to the cup.  It has then been given a coat of Dimensional Magic to give it a glossy appearance.  


The pink card stock has been cut/embossed using the Hemstitch Rectangles Etched Dies Venise Lace by Becca Feeken, then lightly sanded using a Sanding block - this has been popped up onto a pre-cut card base using Scrapbook Adhesives by 3L 3D Foam Squares. 

A strip of contrasting patterned paper has been adhered to the left of the card front.  A Doily has been cut/embossed using the Nestabilities Heart & Home Circle Delight Etched Dies and pale ink patterned paper and has been popped up onto the top portion of the card front using Scrapbook Adhesives by 3L 3D Foam Squares. 

The teacup has been popped up slightly off centre on the doily using 3D Foam Squares and a computer generated sentiment has been adhered at the side of the cup. 250 Count - White Pearls have been adhered around the doily, followed by a Bling Bracket by Nina Brackett below the Doily. 250 Count - White pearls have been adhered to the centre of the bracket and to each corner of the card,


Want2Scrap Products:
  • Chipboard Teacup
  • 250 Count - White Pearls
  • Bling Bracket by Nina Brackett
Other: Spellbinders:  A-2 Matting Basics B Card Creator Etched Dies; S5-308 Nestabilities Hemstitch Rectangles Etched Dies Venise Lace by Becca Feeken; S4-511 Nestabilities Heart & Home Circle Delight Etched Dies; SDS-066 Floral Set Stamp and Die Set from the Joyous Celebrations Collection by Sharyn Sowell
 Scrapbook Adhesives by 3L:  E-Z Adhesive Runner, 3D Foam SquaresBeacon Adhesive: Zip Dry Liquid Glue; Imagine Memento Luxe Ink in Rose Bud. White card stock; patterned paper; Sanding Block; Dimensional Magic; computer generated sentiment.

Thanks so much for stopping by and the lovely comments you leave - they are appreciated.  I hope you are inspired to add some of the beautiful Want2Scrap pearls to your projects
.
I would love you to visit me on my Blog: Lovely Linda's Craft Central
{{{Hugs}}} and Happy Creating


LinkWithin

Related Posts with Thumbnails
Pin It button on image hover