Friday, December 29, 2017

Holiday Thank You


Hello Everyone, Terre with a holiday thank you card created using Want2Scrap© Chipboard Embellishments Style A, 72 Count White Pearls and Swirls Finesse Le Creme Pearls.
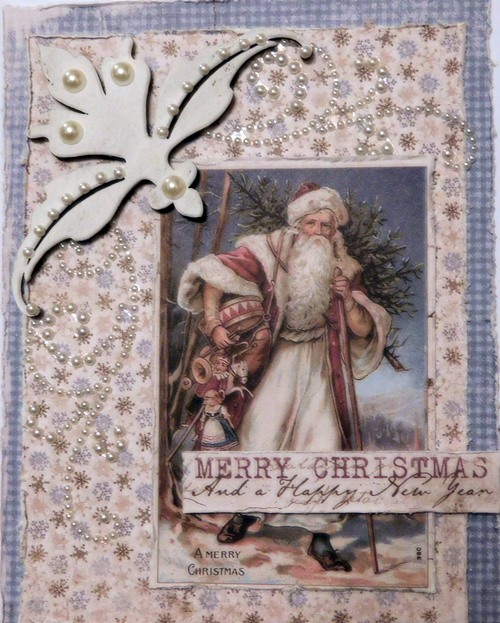
 I distressed the edges of the card to give it that old world look and feel, especially since Santa is an Old World Santa.
On the Want2Scrap© Chipboard Embellishments Style A piece, I used white acrylic paint and my finger to paint it to also give it a distressed look.

I hope everyone had a wonderful Christmas, and now is the time to start your handmade thank yous. I hope you enjoyed my thank you card. Crafty Smiles,


Thursday, December 28, 2017

Shabby Victorian Card

Hello Want2Scrap friends, Lovita Here! 
Today I am sharing with you how I created this beautiful 
Victorian inspired greeting card.


I first cut and folded a 6" x 5" card from 12" x 12" craft card stock by ColorBok. I distressed the edges of the card using Color Box Mixd Media Inx - Leather. I tore and distressed the edges of designer papers, from two of The Paper Studio's collections - Theodosia Square and Tattered & Worn, then layered them. 

Want2Scrap's Victorian Boot Small Chipboard Embellishment is painted black using Americana craft paint. The beauty of the Victorian Boot is further enhanced with gathered lace and trims, a sweet dark pink rose, and Want2Scrap Sleek Strips 12" Pearls - LeCreme. It is attached using dimensionals. Lastly, Want2Scrap's Swirls Finesse - LeCreme Pearls and Bulk Bling Pearls - LeCreme were added as a beautiful accent.


HAPPY CRAFTING!

Tuesday, December 26, 2017

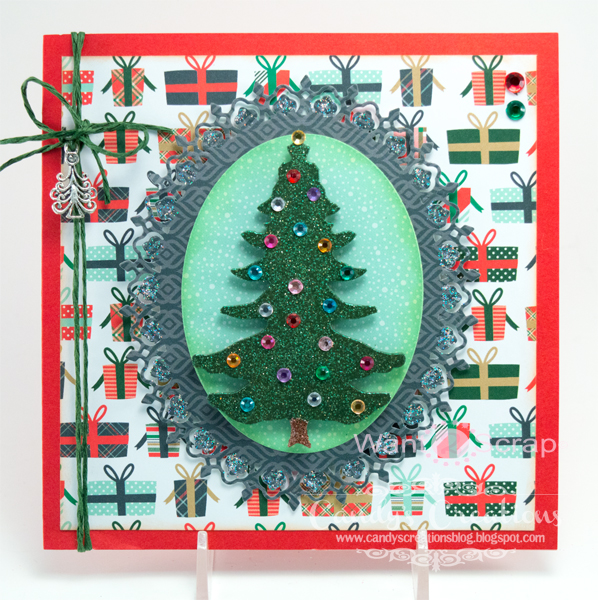
Festive Christmas Tree Card

Candy here and today I am sharing my Festive Christmas Tree Card featuring the Pine Tree Chipboard along with the Multi Color Bling Rhinestones.  The design paper on this 6" x 6" card is from Echo Park. I die cut the design paper using the Spellbinders Ovals LG and the Spellbinders Oval Majesty, adhering the die cut oval to the Oval Majesty using Zip Dry Glue.


First, I painted the Pine Tree Chipboard with a thin coat of Gesso. Next I inked the green part of the tree with Pearlescent Ivy Tsukineko Brilliance Pigment Ink, then added Sparkle 'N Sprinkle Cosmic Semi-Transparent Embossing Powder in Bull Frog, tapped off the excess and heat set.  For the tree trunk I used Tsukineko Brilliance Pigment Ink in Galaxy Gold, then added Sparkle 'N Sprinkle Opaque Embossing Powder in Brown, tapped off the excess and heat set.  I adhered the Multi Color Bling Rhinestones on the Christmas Tree and then adhered it to the die cut using Pop Dot Adhesive Double Sided Glue Dots.


I tied some green twine to the side of the card and added the Christmas Tree Swirls Charms in Antique Silver. Finally, I adhered a Red Rhinestone and a Dark Green Rhinestone to the upper right hand corner of the card front.


Merry Christmas!


FESTIVE CHRISTMAS TREE CARD

Want2Scrap Products and Products Carried by W2S:


Other Products:  Spellbinders Ovals LG; Spellbinders Oval Majesty; Ranger Diana Wakley Media White Gesso; Canvas Corp Brands 12 x 12 Red Cardstock; Echo Park 6 x 6 Paper Pad - Deck the Halls; Memento Dye Ink - New Sprout and Desert Sand; Tsukineko Brilliance Pigment Ink - Galaxy Gold and Pearlescent Ivy; Sparkle 'N Sprinkle Cosmic Semi-Transparent Embossing Powder - Bull Frog; Sparkle 'N Sprinkle Opaque Embossing Powder - Brown; Ranger Stickles - Disco Ball; Green Twine

Monday, December 25, 2017

Chipboard Ornament Set

Candy here and today I am sharing my Chipboard Ornament Set featuring the Ornaments Small Round 2" 4 Pack of Chipboard Shapes.  I decorated the ornaments using design paper from the Echo Park's The Story of Christmas 6" x 6" Paper Pad. The Spellbinders Classic Circles SM Die coordinates perfectly with these ornaments, making it really quick to cut out the design paper to cover these ornaments.


First, I painted the Small Round Chipboard Ornaments with a thin coat of Gesso.  Then on the top of each ornament I inked each with Tsukineko Brilliance Pigment Ink in Galaxy Gold, added Wow Embossing Powder/Glitter in NuBean Sparkle, tapped off the excess and heat set it each one.  Using a sponge dauber I inked the edges of two of the Chipboard Ornaments with Northern Pine Memento Ink and inked the other two Chipboard Ornaments with Desert Sand Memento Ink. I then adhered the darker design paper that had been die cut with the coordinating Spellbinder Circles SM using Zip Dry Glue to the Chipboard Ornaments that had been inked with the Northern Pine Ink and adhered the lighter design paper die cuts to the ornaments that had been inked with the Desert Sand Ink.  After the design paper had been adhered I sponged the edge of each ornament with the coordinating inks, to add a finished look to each ornament.


I decorated these ornaments using Red Pearls Baby Bling, the Red Sleek Strips 6" Rhinestones and the Dark Green Sleek Strips 6" Rhinestones, cutting the Sleek Strips apart as needed.


I decorated these ornaments using LeCreme Pearls Baby Bling and the small rhinestones from the 72 Count - Amber Rhinestones set.  Finally, I added White Seam Binding creating a loop to hang each ornament.


This project would be a great craft project for a 4-H Club, a Girl Scout Troop or a ladies group.  Have a great day!                                           


CHIPBOARD ORNAMENT SET

Want2Scrap Products and Products Carried by W2S:


Other Products:  Spellbinders Classic Circles SM; Echo Park 6 x 6 Paper Pad - The Story of Christmas; Ranger Diana Wakley Media White Gesso; Memento Dye Ink - Northern Pine and Desert Sand; Tsukineko Brilliance Pigment Ink - Galaxy Gold; Ranger Embossing Powder - Gold; Art Glitter Ultrafine Transparent - Crystal and Silk Ivy

Sunday, December 24, 2017

Frosted Cookie Ornament

 Hello Everyone, Terre here with another handmade ornament for my little girl's tree. This one is made using Want2Scrap© 72 Count Red Rhinestones and Baby Bling Silver Rhinestones.
This ornament is one of my favorites, I had so much fun die cutting the Christmas tree and making it look like a frosted sugar cookie, it brought back memories of baking cookies with my mom and frosting them and don't forget the sprinkles. I hope that this year you too have created a few of your own memories with your kids and family members, cherish those times, when they look back and think of a special memory with you, it will make them smile and remember that moment.

Happy holiday's and Merry Christmas. Crafty Smiles,


Snowflakes Holiday Tag

Candy here and today I am sharing my Snowflakes Holiday Card featuring the Snowflakes #2 Chipboard Embellishment and the Snowflakes #3 Chipboard Embellishment.  I decorated this 3 1/4" x 6 1/4" Tag using design paper from Echo Park.


First, I painted the Snowflakes #2 Chipboard Embellishment and the Snowflakes #3 Chipboard Embellishment with a thin coat of Gesso.  Then for the gold snowflake I inked it with Tsukineko Brilliance Pigment Ink in Galaxy Gold, added Wow Embossing Powder/Glitter in NuBean Sparkle, tapped off the excess and heat set it.  For the white snowflake I inked it with Tsukineko Brilliance Pigment Ink in Platinum Planet, added Ranger Embossing Powder in Snowflake Tinsel, tapped off the excess and heat set it.  I then added a LeCreme Pearl to the gold snowflake and several Iridescent Rhinestones to the white snowflake.  I adhered the snowflakes to the tag using Pop Dot Adhesive Double Sided Glue Dots, cutting them to fit as needed, and layering them as needed to create the desired height.


I added Sleek Strips 6" Pearls in LeCreme to the top and bottom of the tag.  Next I added the cream seam binding to the tag and added Decorative Bells in Gold to the end of each ribbon.


Happy Holidays!

SNOWFLAKES HOLIDAY TAG

Want2Scrap Products and Products Carried by W2S:


Other Products:  3 1/4" x 6 1/4" Tag;  Echo Park 6 x 6 Paper Pad - The Story of Christmas; Ranger Diana Wakley Media White Gesso; Memento Dye Ink - Northern Pine and Desert Sand; Tsukineko Brilliance Pigment Ink - Galaxy Gold and Platinum Planet; Ranger Embossing Powder - Snowflake Tinsel; Wow Embossing Powder/Glitter - NuBean Sparkle; Cream Seam Binding

Friday, December 22, 2017

Postal Friendly Christmas Card

Hello Want2Scrap friends, Lovita Redd here! I want to share with you how I created a bulk-free dimensional christmas card.


The craft colored card base is a 6" x 5" top fold constructed from ColorBox cardstock. The edges were distressed using Color Box Mixd Media Inx - Leather. 

Next I cut a 5" x 4" and 4 1/2" x 3 1/2" piece of designer paper from The Paper Studio and tore the edges. The 5" x 4" paper was secured using Want2Scrap 1/4" score tape. Dimensional foam tape was used to raise the 4 1/2" x 3 1/2" paper. 

I painted a Want2Scrap chipboard Christmas tree embellishment, glued green designer paper to one side, distressed the edges, and secured it to the card using dimensional foam tape. I painted a tiny wooden star white, and after drying covered it with a layer of glitter glue for a little sparkle and shine. 

I accented one corner with a Want2Scrap bulk pearl. Lastly, for a little whimsy, I added a Want2Scrap Swirl Finesse - White Pearl to the left side.


Want2Scrap items used:

Other items used:
The Paper Studio (477125 & 119602)

LinkWithin

Related Posts with Thumbnails
Pin It button on image hover