Thursday, November 17, 2016

Want2Scrap and Quick Quotes Inspiration Week Continues!

Hello and welcome!  Susie here today to share a layout I created by combining a chipboard quote from Want2Scrap with the Honeycomb Collection from Quick Quotes!  These papers have the perfect colors for scrapping your fall pictures - oranges, blues, greens and creamy off white!  I had to use them to scrap this picture of my daughter's first trip to the pumpkin patch!
I started by typing my journaling straight onto the page then began distressing, inking and layering the papers.  I used Quick Quotes PowderPuff Chalking Inks to lightly stamp some falling leaves on the background.
Here's a close-up. You can see I used more than one color for the stamped images before adding a die cut leaf cut from the bright orange paper in the collection.
I created an oversized photo mat from the patterned paper to really frame that precious photo.
Creating the title using a chipboard quote from Want2Scrap was the easiest part!  I love the rustic feel you get from the natural chipboard but I wanted a slightly different color. I used clear embossing powder to make the color a bit richer and then added it to my page as the perfect finishing touch!

Want2Scrap Supplies for Best Day Ever Layout:

Cross Promotional Supplies:
Other: We R Memorykeepers typewriter, BoBunny Stamps and Die, sticker alpha, tag, twine, clear embossing powder.
Thanks for stopping by and I hope you find some time to play today!  Susie

Wednesday, November 16, 2016

Want2Scrap and Quick Quotes Inspiration Week

Hello friends - it is Linda here with a little change of pace for me today - I have just started an Art Journal and am excited to be able to share it with you today - well 2 pages anyway - it is still a Work in Progress..., I am excited to be using products from both Want2Scrap and one of our very generous Preferred Partners - Quick Quotes Scrapbook Company.  Both companies have come together to have an inspiration week - how much fun is that!!


I have have used recycled card stock to make my journal - I love to be able to recycle and create something I love with it - win:win


Page 1 has been created using both designer paper and chipboard embellishments - I love the way they co-ordinate and make the thinking process so easy.  I have cut the Seth Apter Citrus Slice in half and adhered them to opposite sides of the page.  They been outlined using Nestabling Heart Circles - Black Rhinestones - which have also been cut in half.  


The tickets are from the Earth Wind and Fire Chipboard Die Cuts and fit the theme perfectly.  I have to be honest and say that it really came together so easily - and we love that - don't we!!  


Page 2 has been created using the Negative Die from the Seth Apter Citrus Slice to frame the Vellum Quote.  I have used the excess bling from the Nestabling Heart Circles - Black Rhinestones to embellish the inside of the Die cut frame.  The butterfly has been stamped, coloured and layered onto the top of the page using Beacon Adhesive Zip Dry Glue and a 72 Count - Amber Rhinestones - Self Adhesive to the center of the butterfly.


I have created Faux Washi Tape from offcuts of the Earth Wind and Fire paper. I have also recycled a portion of an old measuring tape and added it to both pages...not much wasted here!!

Want2Scrap Supplies:

Cross Promotional Partners: 
Other: Scrapbook Adhesives by 3L:  E-Z Adhesive Runner, 3D Foam Squares;; vintage lace; pink card stock; Rose Braid; stamped butterfly;

Thanks so much for stopping by and the lovely comments you leave - they are appreciated.  I hope you are inspired to add some of the beautiful Want2Scrap bling to your projects, and make sure you check out Quick Quotes Scrapbook Company - their range is incredible!
.
I would love you to visit me on my Blog: Lovely Linda's Craft Central


Hugs and Happy Creating


Monday, October 10, 2016

Watch the Killer Whales Overlay!

Susie here with a layout about a Killer Whale Watch excursion I enjoyed with my family last year. It features a laser cut overlay from Want2Scrap and one of the Chipboard Quotations!  This outing was one of the highlights of our trip to Alaska and the Whale 12x12 overlay was the perfect start to my scrapbook page!

The Whales Overlay comes with a white background paper.  The first thing I did was to adhere the laser cut outs of the whales to the white paper. Then I took out my craft knife and carefully trimmed around the outside edge of the whales and discarded the rest.
 
The first photo I added was one of a whale breaching! I used 1/8" "Tear-ific" Tape from Sparkle N Sprinkle on the backside of the frame to adhere the photo in place.
I chose this photo-realistic paper of the ocean to back the overlay.  It came with a double white border printed along the outer edge - such a nice detail!
I decided to accent that detail by trimming down the outside of the overlay so that it fit perfectly inside the border!  (I will admit that I purposely lined up the horizon line of my photo with the horizon in the paper!)

I heat embossed "The Best Day Ever" Chipboard Quotation with Red Glitter Embossing Powder.  It picked up the red from my pictures and really made the perfect title!
I take a lot of pictures so I often create multi photo collages on my layouts. I print my photos with a white border.  If you are unable to do that and want to get the same look, just double mat them with both white and black cardstock. I just play with the placement of the pics until I find an arrangement that works for me!
Suprise!  That center photo flips up to reveal one more picture

Want2Scrap has an amazing assortment of laser cut overlays to help with your scrapbooking.  Check out all of your choices HERE.

 Thanks for stopping by and I hope you find some time to play today!  Susie


Want2Scrap Supplies for Killer Whale Watch layout:

Cross Promotional Partner Products:
Other Supplies:
  • Paper House Productions Nautical Paper Crafting Kit
  • Red Glitter Embossing Powder

Friday, October 7, 2016

Dog Chipboard Embellishments

Candy here and today I want to share with you a couple techniques to create beautiful dog chipboard embellishments for your projects.  I created this adorable dog scene using Want2Scrap's Dog Chipboard Embellishment, a Doghouse Chipboard Shape, and a Fence Chipboard Embellishment.


To create the the Doghouse, using a pencil I traced around the different sections of the Doghouse on the design paper and scissor cut out the sections. I adhered the design paper sections to the chipboard with Dries Clear Adhesive.  To get an even more precise edge I then used a nail file along the edges of the Chipboard Doghouse.  I sponged Old Paper Distress Ink along the edges and inside the opening of the Doghouse to create depth and shading.  I then adhered the striped beige design paper to the back of the Chipboard Doghouse to cover the opening.


I heat embossed the Chipboard Dog and Chipboard Fence.  Before I started I covered each piece with Gesso.  For the Chipboard Fence I covered it with Clear Emboss It Ink and then added Weathered White Embossing Powder.  I tapped off the excess and heat set it.  To create the Chipboard Dog I covered it in Tree Branch Wendy Vecchi Archival Ink and added the coordinating Tree Branch Embossing Powder.  I tapped of the excess and heat set it.  Embossing chipboard creates a beautifully covered surface.


This scene I created is now ready to be added to a scrapbook page!


Fore more creative projects, please visit my blog, Candy's Creations.  Have a great day!


Want2Scrap Products:


Cross Promotional Partners:


Other Products:

Gesso, Tim Holtz Distress Ink - Old Paper; Nail File, Inkssentials Emboss It Clear; Ranger Embossing Powder - Weathered White Antiquities; Wendy Vecchi Archival Ink - Tree Branch; Wendy Vecchi Embossing Powder - Tree Branch; Heat Gun


Wednesday, October 5, 2016

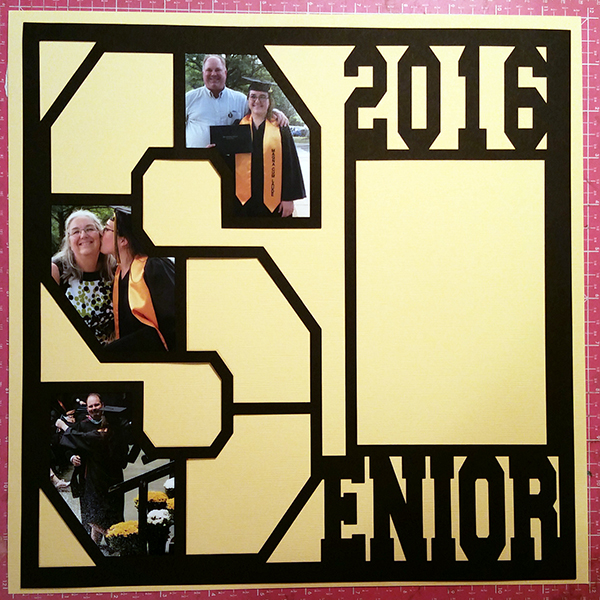
Senior Year Overlay

Susie here today and I am sharing a fun layout I created using the Want2Scrap Senior Year Overlay.

The overlay is designed so that there is a collage area all ready for your pictures.

I used the overlay as a guide to cut pictures to the right size and shape:.


I flipped it over and added 1/8" Double Sided "Tear-ific" Tape around the edges...

... and then pulled up the liner and adhered the photo.

I added the photos one at a time.  I had a lot of photos so I was able to completely fill in the collage.  If you don't have enough pics, you can fill in the open segments with coordinating patterned paper.

Then I  adhered the main photo and edged it with Sleek Strip 6" Rhinestones in black.
.
Here's a close up:

Thanks for stopping by and I hope you find some time to play today!  Susie

Want2Scrap Supplies for High School Senior Layout:

Cross Promotional Partner Products:
Other supplies:  cardstock

Monday, October 3, 2016

Christmas is in the Air Chipboard Album


Hello Everyone, Terre here with a Christmas Chipboard Album that is sure to get you in the mood for the holidays. This adorable chipboard album can be found at Want2Scrap© along with all the bling you will need to decorate your very own album.


To secure my pattern paper to the chipboard album, I used Beacon Adhesives Zip Dry as it dries clear and is perfect for the albums.


Thank you for stopping by the blog today, I hope you try creating your very own album, Want2Scrap© has several to choose from.

Crafty Smiles,

Friday, September 30, 2016

Camping We Will Go

Hello Everyone, Terre here with a fun creative chipboard album from Want2Scrap©. On the wheels I used 72 Count Black Rhinestones.

To enhance the page I used the Enamel Dots 8mm - white.

On this, I used several different colors of bling, pearls and enamel dots.

I just love using the Turquoise Enamel Dots and the Swirl Finesse Black Rhinestones, they happen to be some of my favorite products at Want2Scrap©.

Thank you for stopping by the blog today, make sure to follow us on Facebook and leave us a comment. Crafty Smiles!
 

LinkWithin

Related Posts with Thumbnails
Pin It button on image hover