Wednesday, January 30, 2013

Create a Valentine They Will L♥ve to Display Year Round!


Hi everyone!
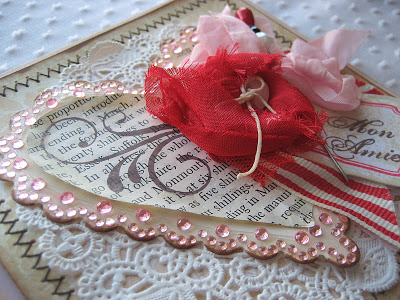
True :D  here today to share another simple but elegant project with you. 
How many times have you poured your heart into a Valentine, only to see it put away in  a drawer or *gasp* thrown in the garbage? Why not make them something this year that they will love to display? This sweet little heart can be hung on a wall, doorknob, or even on a rear view mirror in a car. :)

(Click on photos for a closer peek)

It was quick and easy to make using Spellbinder dies and Want2Scrap bling.


The designer cardstocks are some that I illustrated for Inky Antics. I have to say that it is super fun working with your own creations! :)

I stamped a sentiment on the back from my Inky Antic's #1115MC "Swirly Bird" clear stamp set. There is still plenty of room for a hand-written message as well.

Want2Scrap Products Used:

Preferred Partner Products Used:
Spellbinders Paper Arts - Classic Hearts and Scalloped Classic Hearts Nestabilities, and Grand Calibur
ClearSnap - ColorBox inks - Dark Moss and Orchid Pastel
Art Glitter - Sea Shell transparent ultra-fine glitter and Designer Dries Clear glue
Beacon Adhesives - Fabri-tac glue

Other Products Used:
Inky Antics - #IA-PAC003 "Everything's Coming Up Roses" and #IA-PAC004 "Green In Stitches" designer cardstocks by Trudy Sjolander Designs
Inky Antics - #1115MC "Swirly Birds" clear stamp sets by Trudy Sjolander Designs
Really Reasonable Ribbon - Mauve Velvet Ribbon
Wild Orchid Crafts - Mulberry Paper Roses
Deckle scissors

Thanks so much for dropping by! Please feel free to share or pin. I would love it if you left a comment too! :)
HUGS!!!

Tuesday, January 29, 2013

A Wordless Book

I love taking photos of my kids and their changing expressions.  This book evoked many of those expressions in my son, and I knew that they would make a great layout.

I left one space in my grid open, and used a few carefully chosen items to create a title space, as well as some texture for my page.


Want2Scrap™ Products Used:
Jewel Fantasies by Julianna Hudgins
Nestaboard Labels Eighteen

Partner product: 
Beacon Zip Dry
Glue Arts Extreme Tac Runner

Sunday, January 27, 2013

Canvas Project: Take the Time 2 Create


It's a New Year's Resolution for a lot of us.
Make time to create.
I need the reminder.

You too, can make a SIMPLE canvas.

I created this SUPER simple canvas.
by using a piece of balsa wood.

I decoupaged some napkins onto the board.
 I added a coat of paint, and created a whitewash finish by
dry brushing some Gesso.

I sanded and inked around the edges with 
I added some Tissue Tape,
a transparency,
a beautiful chevron border,
some words and hardware...
a few buttons,
some bulk LOOSE bling, and 
and the title...

The Fancy chipboard title Create was painted with Gesso and 
coated with Medium and then
dusted with Fairy Dust from our preferred partner, Clearsnap.


VOILA...

Take the time 2 Create...


Supplies:

Want2Scrap™ Products Used: 


Preferred Partner Products Used:

Clearsnap - Fairy Dust Glitter by Donna Salazar, Mix'd Media Inx® by Donna Salazar 


Additional Products Used:

Buttons - Buttons Galore and More, Hardware and Tissue Tape - Tim Holtz, Trim - BoBunny and Close to My Heart, Letters - Paper Studio, Paint - Gesso and Medium - Ranger Ink, Transparency - Heidi Swapp

DID YOU NOTICE the loose BLING???

Want2Scrap's wonderful BLING is now available in bulk! The possibilities are ... well ... ENDLESS.

Thanks for stopping by today. Make time 2 create.

See more of my Mixed Media creations in my gallery at Larkspurs on Saturday.


Saturday, January 26, 2013

Scrapbook LOVE, girly style!

I can't help it!  I HAVE a girl, I AM a girl, and I LOVE bling...


It's a BEAUTIFUL problem...


Especially, when you combine products from Want2Scrap® and My Little Shoebox!


Don't you just LOVE "daughter", all 3-D and accented with a touch of color and sparkle!  Shhhh!  It's really the word "Goddaughter!" {I'm saving "God" for ANOTHER project!} Although Want2Scrap® chipboard products are heavy duty, and AMAZING!, they snip easily for customizing!


And SPEAKING of the wonders of Want2Scrap® - Don't EVER underestimate us!  Even the PACKAGING is useful!  I save my leftovers as a palette for gluing and embellishing...   Glittered and glued embellishments DON'T stick to the packaging, so they make an excellent work surface!

 
Just a hint of easy to apply color with some Clearsnap, pops a custom hue, accented with some all-purpose Rock Candy Distress Stickles from Tim Holtz and Ranger...  Mmmmm, hmmm, the PERFECT recipe for fun and fat free EYE candy!  Yumm-O!  {I LOVE our sport!}

Oh, and I love my lil' girl, too!  That's why it's SUCH a blast to scrapbook her wee little face and life's adventures, using products, and ESPECIALLY bling, from Want2Scrap®.  I sure hope I've inspired YOU to bling up some scrappy fun in YOUR day! 


Thanks for letting me gush!  Uh, I mean, INSPIRE you!  Have a delightful day!


Supplies -

Want2Scrap Products -

"Goddaughter" Fancy Chipboard Word
Beautiful Bling Borders, by Nina B. - Beautiful Blooms
Sleek Strips, Silver Rhinestones
Wonderful Wings Bling

Cross Promotional Products Used -

My Little Shoebox, LLC - Secret Garden
Ink - Clearsnap
Adhesive - Glue Arts

Additional Products -

Stickles - Ranger/Tim Holtz

Friday, January 25, 2013

Valentine Inspiration

We LOVE our Design Team.
We thought we'd gather some of our FAVORITE
Valentine and Love themed designs, 
for your inspiration.

If you LIKE any of these projects,
be sure and show our Designers a little LOVE.


We're a FAN of Laura Cox


Check out this super simple altered container for Want2Scrap™.


Want2Scrap, how do I love thee? let me count the bling adorned ways!


NESTABLING.......BE MINE!!!!


Give a little love and a stick pin tutorial


Want 2 Scrap sponsors the JUGS Challenge!

"Tis So Sweet

Nina here today with another card. I just love the color combo of this one: pink, red and Kraft. I first cut a panel of patterned paper from Authentique's Lovely Collection and adhered it on a pink card stock. I die cut Spellbinders Window #2 die on kraft and popped it up using GlueArts U-Cut-It® 4x4.   

I decorated the window with Want2Scrap's Bling Hearts - Pink and Red Rhinestones on the top and Sleek Strips Pearls-White along the bottom.
W2S-Feb-13-2
The sentiment is from The Craft's Meow's Beautiful Hymns set. The bird is from Happy as a Lark set, also by TCM. A little bit of twine above the sentiment and the card is done.
W2S-Feb-13-2-det
Doesn't this card scream spring? I can't wait! :)


Want2Scrap Products used:


Come visit me on my blog, Crafting in Croatia.

Wednesday, January 23, 2013

Embellishing a Store Bought Frame

We love our preferred partners. When I saw these papers from Authentique, I was so immediately inspired to start crafting.


I started with a plastic frame from Ikea. First off, I could not believe this was plastic, it's so NICE!
I die cut several flowers using Spellbinder's Spiral Blossom.

Most of the other pieces are ready made.
The Bird on a Branch is a silhouette.
I used one of Donna Salazar's Puzzle Pack pieces and covered it with yellow patterned paper,
distressed it by sanding, and glazed it with glossy accents.

Then, it was time to drip the bling.
I took Sleek Strips and made a few cuts so I could round the corners of the inner opening.
I carefully trimmed around the butterflies from the Wonderful Wings Nestabling set, and left the clear backing intact, and just glued using a glue dot. Finally, I added some strips of Nina Brackett's gorgeous Chevron Bling Border to the tabbed card.


This project really didn't take very long, but I'm so pleased with the results.
What do you think?

Want2Scrap Supplies

Donna Salazar's Puzzle Pack
Sleek Strips - Silver

Preferred Partners

Authentique - the Renew Collection
Spellbinders - Spiral Blossom One
Beacon's Adhesive - 3-in-1

If you love this paper and would like to see some more projects I created with it, check out my blog post here.

Thanks for stopping by today. Check out Today's Special at Want2Scrap.


LinkWithin

Related Posts with Thumbnails
Pin It button on image hover